Home Tips & Guide
Category:

Tips & Guide

24

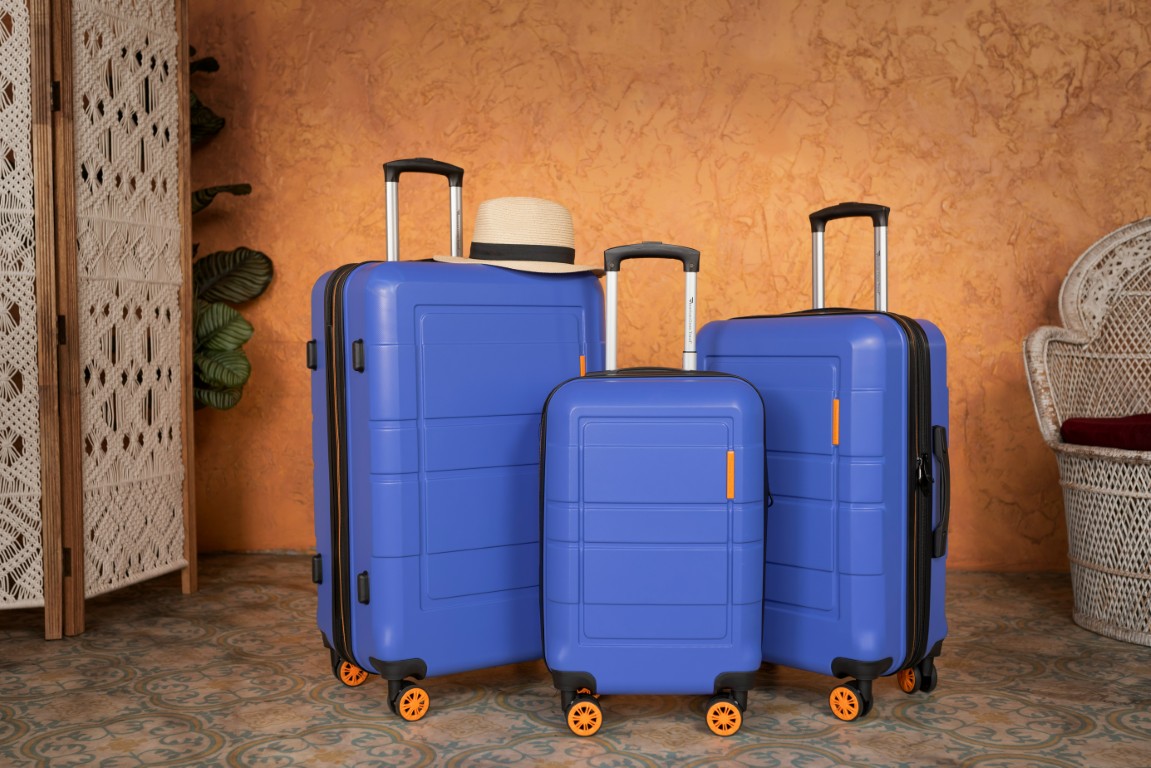
Picture this: you’re rushing through the airport, your flight is boarding, and your carry-on wheel just broke. We’ve all been there, or at least feared being there. Your carry-on luggage isn’t just a bag—it’s your travel lifeline, holding everything you need for your journey while staying by your side throughout the adventure.

After years of watching travelers struggle with ill-fitting bags that won’t close, wheels that wobble like shopping carts, and handles that extend when you least expect it, I’ve learned that choosing the right carry-on can literally make or break your travel experience. This isn’t just about finding a bag; it’s about finding your perfect travel companion.

Why Your Carry-On Choice Matters More Than You Think

Let’s be honest—we don’t spend nearly enough time thinking about our luggage until something goes wrong. But here’s the reality: your carry-on will be lifted, pulled, pushed, stuffed into overhead bins, and potentially dropped more times than you can count. It needs to protect your belongings while making your life easier, not harder.

I’ve seen business travelers miss important meetings because their laptop was damaged in a flimsy bag, and families struggle through airports with heavy, awkward luggage that turned their vacation into an ordeal before it even began. The right carry-on doesn’t just hold your stuff—it enhances your entire travel experience.

Decoding Airline Size Restrictions: The Foundation of Smart Shopping

Before you fall in love with any particular bag, let’s talk about the elephant in the room: airline restrictions. Most major airlines stick to the 22″ x 14″ x 9″ inch rule (that’s roughly 56 x 36 x 23 cm for our metric friends), but here’s what the airlines don’t advertise—these measurements aren’t universal.

Budget airlines like Spirit or Frontier often have smaller requirements, sometimes as restrictive as 18″ x 14″ x 8″. International carriers can vary wildly, and some smaller regional airlines have even tighter restrictions. I always recommend checking not just your primary airline, but any connecting flights or alternative carriers you might use.

Weight restrictions add another layer of complexity. While most airlines allow 15-22 pounds for carry-ons, some ultra-low-cost carriers cap it at just 15 pounds, including the weight of the bag itself. This is where lightweight luggage becomes crucial—every ounce of bag weight is an ounce less of your stuff you can bring.

Pro tip from frequent flyers: if you regularly travel on different airlines, choose luggage that meets the most restrictive requirements you’ll encounter. It’s better to have slightly less space than to face gate-check fees or the stress of repacking at the airport.

The Great Material Debate: Hard Shell vs. Soft Shell

This decision shapes everything else about your luggage experience, so let’s dive deep into what really matters.

Hard Shell Luggage: The Fortress Approach

Hard shell cases are like mobile armor for your belongings. Made from materials like polycarbonate, ABS plastic, or aluminum, they create a protective barrier that’s particularly valuable if you’re carrying electronics, fragile souvenirs, or expensive items.

The weather resistance is outstanding—I’ve seen hard shell bags emerge from rain-soaked cargo holds with completely dry contents. They’re also incredibly easy to clean. Spill coffee on a hard shell case? No problem, just wipe it down.

But here’s what manufacturers don’t always emphasize: hard shell bags can be less forgiving when it comes to tight overhead bins. They maintain their shape, which is great for protection but not so great when you need to squeeze into a full compartment. They’re also typically heavier, which cuts into your weight allowance.

Soft Shell Luggage: The Flexible Friend

Soft shell bags are the chameleons of the luggage world. Made from materials like ballistic nylon, polyester, or canvas, they can compress slightly when needed and often feature external pockets that hard shell bags simply can’t offer.

The weight advantage is significant—a quality soft shell bag can weigh 2-3 pounds less than its hard shell counterpart. For frequent travelers who maximize their weight allowance, this difference is game-changing.

External pockets are a soft shell superpower. Need quick access to your boarding pass, phone charger, or snacks? External pockets have you covered. But remember, these same pockets can make your bag bulkier and harder to fit in tight spaces.

The trade-off? Less protection for fragile items and potential vulnerability to tears, stains, and weather. However, modern soft shell materials are remarkably durable—some ballistic nylon bags can withstand decades of heavy use.

Understanding Your Travel Personality

Not all travelers are created equal, and your luggage should reflect your unique style and needs.

The Business Warrior

If you’re constantly traveling for work, your priorities likely include professional appearance, laptop protection, and organizational features. You need a bag that looks appropriate in boardrooms and protects expensive electronics. Hard shell cases often work well here, providing a polished appearance and excellent protection for devices.

Look for dedicated laptop compartments that open separately from the main bag—this speeds up security screening considerably. Some business-focused bags include features like garment folders that keep shirts wrinkle-free, or external pockets positioned for easy access to business cards and documents.

The Adventure Seeker

Weekend warriors and adventure travelers need bags that can handle rough treatment and varying conditions. Soft shell bags often excel here, offering durability and flexibility. Look for reinforced corners, heavy-duty zippers, and materials that can handle everything from sandy beaches to snowy mountains.

Water resistance becomes crucial if you’re headed to unpredictable climates. Some bags feature water-resistant coatings or rain covers that provide extra protection during unexpected weather.

The Family Coordinator

Traveling with family means juggling multiple people’s needs while staying organized. You might benefit from bags with multiple compartments to separate different family members’ items, or bags with expansion capabilities for return trips loaded with souvenirs.

Easy-rolling wheels become essential when you’re also managing kids and their belongings. Four-wheel spinners often work better for family travel because they require less physical effort to maneuver.

The Minimalist Traveler

If you pride yourself on packing light and efficiently, focus on bags that maximize internal space while minimizing weight. You’ll want clean designs without unnecessary external pockets that might tempt you to overpack.

Compression features can be valuable here, allowing you to pack more efficiently and secure items during travel.

Wheel Wisdom: Two vs. Four and Everything in Between

The wheel debate is more nuanced than most people realize, and your choice significantly impacts your travel experience.

Two-Wheel Traditional Design

Two-wheel bags (often called rollaboards) excel on varied terrain. Stairs, cobblestones, gravel paths—two wheels handle it all. The wheels typically recede into the bag when not in use, maximizing internal packing space.

These bags are pulled behind you, which means they won’t roll away on inclined surfaces—a real advantage on airport jetways or hotel hallways. The pulling motion also tends to be more stable when navigating through crowds.

However, pulling a bag behind you for extended periods can cause shoulder and arm strain. If you have mobility issues or frequently traverse long airport distances, this might not be your best option.

Four-Wheel Spinner Freedom

Spinner bags can roll upright beside you, significantly reducing physical strain. They maneuver like a dream in tight spaces—airport security lines, narrow airplane aisles, hotel elevators. The ability to push rather than pull makes navigation much easier.

The downside? Those wheels take up internal space, and spinner bags can roll away if you’re not careful. They also don’t handle rough terrain as well as two-wheel designs. Ever tried to pull a spinner across a gravel parking lot? It’s not fun.

Modern spinners often feature locking mechanisms or wheels that can be secured, addressing the rolling-away concern. Some premium models have larger, more durable wheels that handle varied terrain better.

The Handle Situation: More Important Than You Think

A telescoping handle might seem straightforward, but the quality difference between good and bad handles is dramatic. Cheap handles can jam, extend unevenly, or break entirely—usually at the worst possible moment.

Look for handles with multiple locking positions to accommodate different user heights. Some handles feature ergonomic grips that reduce hand fatigue during long airport walks. Multi-stage handles (usually two or three positions) work better for shared luggage used by people of different heights.

Test the handle extension and retraction several times when evaluating bags. It should extend smoothly without sticking and lock securely at each position. The handle should feel sturdy when fully extended—wobbling or flexing indicates poor construction.

Don’t forget about side handles and top handles for lifting. These should be reinforced and comfortable to grip when the bag is fully loaded. Some travelers prefer bags with multiple side handles positioned for two-handed lifting of heavy loads.

Zipper Quality: The Make-or-Break Component

Zippers are often the first thing to fail on luggage, and a broken zipper can ruin a trip. YKK zippers are widely considered the gold standard—they’re durable, smooth-operating, and self-repairing for minor snags.

Pay attention to zipper pulls as well as the zippers themselves. Large, easy-to-grip pulls work better, especially when wearing gloves or in stressful situations. Some bags feature lockable zipper pulls that can be secured together for basic security.

Self-repairing zippers can work through minor obstructions, but they’re not magic. Proper packing technique—avoiding overstuffing and ensuring no fabric or items catch in the zipper—is still essential.

Consider the zipper configuration as well. Clamshell designs that open completely make packing easier, while traditional top-opening bags might offer better security and weather resistance.

Interior Organization: Making the Most of Limited Space

The internal layout of your carry-on can make the difference between organized efficiency and chaotic digging through your belongings.

Compression Systems

Many modern bags feature compression zippers that reduce the bag’s profile when not fully packed. This can help with overhead bin storage and prevent items from shifting during travel. Some bags include packing cubes or compression pads that serve similar functions.

Compartmentalization

Consider how you naturally pack and organize. Some travelers prefer one large compartment with maximum flexibility, while others benefit from multiple sections that keep different types of items separated.

Mesh pockets are excellent for small items and provide visibility without unpacking everything. Elastic straps help secure clothing and prevent items from shifting during transport.

Laptop and Electronics Storage

If you carry electronics, dedicated padded compartments are essential. The best laptop compartments are accessible without opening the main bag—this speeds up security screening and provides protection during the process.

Look for compartments sized for your specific devices. A compartment designed for a 15-inch laptop might not properly protect a smaller 13-inch model, and it definitely won’t accommodate a 17-inch laptop.

Security Considerations in the Modern Era

Luggage security has evolved beyond simple locks. While TSA-approved locks provide basic deterrence, modern security concerns require more sophisticated thinking.

RFID Protection

With the prevalence of contactless payment cards and RFID-enabled passports, electronic security has become as important as physical security. Bags with RFID-blocking compartments protect these items from electronic skimming attempts.

Hidden Storage

Some bags feature hidden compartments or pockets that are less obvious to casual observation. While these won’t stop determined thieves, they can protect valuable items from opportunistic theft.

Zipper Security

Zippers can be secured together with small locks, but remember that soft-sided bags can be accessed by cutting the fabric. Hard shell bags provide better security against this type of intrusion.

Visual Deterrence

Sometimes the best security is not looking like an obvious target. Expensive-looking luggage can attract unwanted attention, while more modest bags might be passed over by thieves.

Weight Considerations: Every Ounce Counts

The weight of your empty luggage directly impacts how much you can pack. Ultra-lightweight bags can weigh as little as 4-5 pounds, while heavy-duty options might weigh 8-10 pounds or more.

For occasional travelers, a pound or two might not matter much. For frequent flyers who regularly pack to weight limits, every ounce is precious cargo space.

However, don’t sacrifice essential durability for marginal weight savings. A bag that falls apart after a few trips is no bargain, regardless of its initial weight.

Budget Realities: Finding Value at Every Price Point

Carry-on luggage prices range from under $50 to over $800, with quality options available at most price points.

Budget Options ($50-$150)

Budget bags can provide excellent value for occasional travelers. Look for bags from established brands rather than no-name options. At this price point, focus on basic functionality rather than premium features.

Mid-Range Choices ($150-$350)

This range offers the best balance of features, durability, and value for most travelers. You’ll find quality materials, good warranties, and thoughtful design features without paying premium prices.

Premium Investment ($350+)

High-end bags justify their cost through superior materials, exceptional durability, comprehensive warranties, and innovative features. For frequent travelers, the per-trip cost of premium luggage can be quite reasonable.

Brand Reputation and Customer Service

When investing in luggage, consider the brand’s reputation for quality and customer service. Some brands offer excellent warranty coverage, including free repairs and replacement parts. Others provide lifetime warranties that can make premium bags excellent long-term investments.

Read reviews, but focus on long-term user experiences rather than initial impressions. A bag that looks great in the store might develop issues after months of use.

Special Features for the Digital Age

Modern luggage often includes features designed for contemporary travel needs.

Built-in Charging

USB charging ports built into luggage can be convenient, but be aware of airline restrictions on lithium batteries. Many airlines require removable battery packs, and some prohibit them entirely.

Smart Features

GPS tracking, digital locks, and built-in scales are becoming more common. These features can be valuable but often come with higher prices and potential reliability concerns.

Expansion Capabilities

Some bags feature expansion zippers that increase capacity when needed. This can be helpful for return trips with souvenirs, but remember that expanded bags might not fit in overhead bins.

Testing and Choosing Your Perfect Match

Before making a final decision, consider these evaluation strategies:

In-Store Testing

If possible, visit a store to handle different options. Test the wheels on various surfaces, extend the handles, and get a feel for the weight and build quality.

Load Testing

Pack the bag with your typical travel items to ensure it meets your needs. Check that it closes properly when full and that the weight distribution feels comfortable.

Return Policies

Buy from retailers with generous return policies. Some travelers take new bags on short trips before committing to longer journeys.

Maintenance and Longevity

Proper care extends your luggage’s lifespan significantly.

Regular Cleaning

Clean your bag regularly to prevent stains and odors. Hard shell cases usually need only soap and water, while soft shell bags might require specialized cleaners.

Proper Storage

Store luggage in a cool, dry place when not in use. Avoid extreme temperatures or heavy pressure that could damage components.

Preventive Maintenance

Address minor issues promptly. Loose threads, sticky zippers, or worn wheels can often be repaired before they become major problems.

Common Pitfalls to Avoid

Learn from others’ mistakes:

  • Don’t choose based solely on appearance
  • Avoid assuming all “carry-on sized” bags fit every airline
  • Don’t buy the cheapest option without considering durability
  • Avoid bags with features you’ll never use
  • Don’t ignore weight restrictions when selecting
  • Avoid bags with too many external pockets if you tend to overpack

Making Your Final Decision

The perfect carry-on luggage balances your specific needs, travel patterns, and budget. Create a prioritized list of must-have features versus nice-to-have options.

Consider your most common travel scenarios and choose luggage that excels in those situations. A bag that’s perfect for business travel might not work well for adventure trips, and vice versa.

Remember that the best luggage is the kind you don’t have to think about—it just works, trip after trip, making your travels smoother and more enjoyable.

Conclusion: Your Journey Starts Here

Choosing the right carry-on luggage is an investment in countless future adventures. Whether you’re planning weekend getaways or international business trips, the right bag becomes an extension of yourself—reliable, functional, and ready for whatever your travels bring.

Take time to evaluate your needs honestly, research your options thoroughly, and choose quality over flashy features. The perfect carry-on is out there waiting to become your trusted travel companion, ready to roll beside you through airports around the world and hold everything you need for memorable journeys ahead.

Your next adventure is calling, and with the right carry-on by your side, you’ll be ready to answer with confidence and style.

We’ve all been there. You’re in the middle of an important video call when your connection freezes. Or maybe you’re trying to stream a movie in the bedroom, but the buffering wheel just keeps spinning. WiFi dead zones are incredibly frustrating. The good news? The right router can solve these problems. Let’s break down how to choose one that will blanket your entire home with reliable internet.

Understanding Router Basics: What You’re Actually Buying

Before we dive into specific recommendations, let’s demystify what routers actually do. Your router is like the air traffic controller of your home internet, directing data where it needs to go. It takes the internet signal from your modem and distributes it wirelessly throughout your home.

Single Routers vs. Mesh Systems

Two main options dominate the market today. Each serves different needs and home layouts.

Traditional Single Routers

These are the standalone devices most of us grew up with. One box does all the work.

What’s Great About Single Routers:

1. Cost-effective: They’re typically more affordable. Basic models start around $50, while feature-packed options run $150-300.

2. Simpler setup: Just one device to configure. Most modern routers have user-friendly apps for setup.

3. Powerful signal in close range: They often provide stronger performance near the router. This works well in apartments or smaller homes.

4. More customization options: They typically offer more advanced settings. Tech-savvy users appreciate this flexibility.

5. No inter-device communication delay: Without multiple units talking to each other, there’s less potential latency.

The Downsides:

1. Limited coverage area: A single router struggles with larger homes. Signal weakens through walls and floors.

2. Dead zones likely: Corners of your home may get weak or no signal. Basements and upper floors often suffer.

3. Central placement critical: Location dramatically affects performance. Poor placement means poor coverage.

4. Signal degradation: Distance and obstacles weaken signal strength. Performance decreases as you move farther from the router.

5. Less scalable: You can’t easily expand coverage without replacing the entire unit.

Mesh Router Systems

Mesh systems use multiple devices working together. A main router connects to your modem, while satellite units (called nodes) extend coverage throughout your home.

What’s Great About Mesh Systems:

1. Seamless whole-home coverage: They eliminate dead zones. The system creates a blanket of WiFi throughout your space.

2. Single network name: You don’t switch between networks as you move around. Your devices stay connected automatically.

3. Smart routing: They direct your connection through the optimal path. This prevents bottlenecks and slowdowns.

4. Easy expansion: Adding another node extends coverage further. This makes them adaptable to changing needs.

5. Modern design: Most mesh units are sleek and unobtrusive. They blend into home decor better than traditional routers.

The Downsides:

1. Higher cost: Quality mesh systems start around $150 for two units. Premium systems can exceed $500.

2. Potentially lower peak speeds: Some mesh systems sacrifice maximum speed for consistency. Hardcore gamers might notice this.

3. More complex infrastructure: Multiple devices mean more potential points of failure. Troubleshooting can be more complicated.

4. Requires strategic placement: Nodes need proper positioning for optimal performance. Poor placement diminishes benefits.

5. Overkill for smaller spaces: Studios or one-bedroom apartments rarely need mesh capabilities. It’s like using a pickup truck just to grab a few groceries.

Assessing Your Home and Internet Needs

Before shopping, take stock of your specific situation. This prevents overspending or underbuying.

Evaluating Your Space

Your home’s size and layout play a crucial role in how well your router performs.

Size Considerations:

Under 1,200 sq ft apartments/homes: A single good router usually suffices.

1,200-2,500 sq ft homes: A powerful single router or small mesh system works best.

2,500+ sq ft homes: Mesh systems show their value here. Multi-story homes particularly benefit.

Construction Factors:

Drywall interiors: Signal passes relatively easily. Standard router power often works fine.

Brick, concrete, or stone walls: These materials block signals significantly. More power or additional nodes help overcome this.

Metal construction elements: Metal studs, ductwork, and appliances create signal interference. These homes benefit from strategic node placement.

Counting Your Devices

Modern homes connect more devices than ever. Your grandmother’s house probably had zero connected devices. Today’s average home has 25+ WiFi connections.

Consider everything that uses your network:

– Smartphones and tablets

– Laptops and computers

– Smart TVs and streaming devices

– Video doorbells and security cameras

– Smart speakers and displays

– Game consoles

– Smart appliances

– Thermostats and environmental controls

More devices means more bandwidth needed. Entry-level routers struggle with 10+ active devices. High-end routers effortlessly manage 50+ connections with zero performance drops.

Understanding Your Internet Speed

Your router should match your internet service. Buying a Ferrari router for dial-up speeds makes little sense.

Router Speed vs. Internet Speed:

– If your internet plan delivers 100 Mbps, a router advertising 3000 Mbps won’t make your internet faster.

– However, faster routers distribute your existing speed more efficiently among multiple devices.

– Future-proofing matters: Internet speeds continue to increase yearly.

Key Router Features Worth Considering

Beyond the basic single vs. mesh decision, several features impact performance and usability.

WiFi Standards Explained (Without the Jargon)

WiFi technology keeps evolving. Each generation brings improvements.

WiFi 5 (802.11ac):

– The previous standard, still common in many homes

– Good enough for most current needs

– Typically maxes out around 900 Mbps in real-world conditions

– More affordable today as newer technology arrives

WiFi 6 (802.11ax):

– Current standard for new premium routers

– Better handling of multiple devices

– Improved battery life for connected devices

– Theoretical speeds up to 9.6 Gbps

– Better performance in device-dense environments like apartments

WiFi 6E:

– The latest standard with an added 6 GHz frequency band

– Less congestion means more reliable connections

– Premium feature currently with premium pricing

– Future-proofing choice for tech enthusiasts

In practical terms:

– WiFi 5 works fine for video streaming and general use

– WiFi 6 matters if you have many devices or need the absolute best performance

– WiFi 6E primarily benefits early adopters in dense and congested wireless environments.

Frequency Bands: 2.4 GHz vs. 5 GHz vs. 6 GHz

Modern routers offer multiple frequency bands. Each has strengths and weaknesses.

2.4 GHz Band:

– Longer range but slower speeds

– Better at penetrating walls and floors

– More susceptible to interference from devices like microwaves and baby monitors

– Good for smart home devices and connections at distance

5 GHz Band:

– Faster speeds but shorter range

– Less crowded with fewer interference sources

– Better for streaming, gaming, and video calls

– Struggles more with physical barriers

6 GHz Band (WiFi 6E only):

– Fastest speeds with moderate range

– Very little current congestion

– Limited device compatibility today

– Future-proofing feature worth considering

The best routers use all available bands, automatically steering devices to optimal connections.

Beamforming and MU-MIMO Technology

These technical-sounding features make real-world differences.

Beamforming:

– Focuses signal directly toward connected devices

– Increases range and stability

– Reduces interference for nearby devices

– Standard on most quality modern routers

MU-MIMO (Multi-User, Multiple Input, Multiple Output):

– Allows simultaneous communication with multiple devices

– Reduces waiting time for data

– Particularly helpful in homes with many active devices

– Look for 4×4 MU-MIMO in premium models for best performance

Security Features

Router security has never been more important. Look for these protections:

WPA3 Encryption:

– Latest security protocol

– Stronger protection than previous standards

– More resistant to password-cracking attempts

– Should be considered essential for new router purchases

Auto Updates:

– Automatic firmware updates close security holes

– Convenience increases likelihood of staying protected

– Feature becoming standard on quality routers

Guest Networks:

– Separate connection for visitors

– Blocks unauthorized access to your personal devices and data

– Limits potential exposure from less secure devices

Parental Controls:

– Content filtering capabilities

– Screen time management

– Device-specific restrictions

– Quality varies widely between manufacturers

Popular Router Types for Different Needs

Let’s look at common scenarios and which router types serve them best.

For Apartments and Small Homes

If you live in a space under 1,200 square feet with standard construction:

Best Option: A quality single router placed centrally

What to Look For:

– Dual-band WiFi 5 or WiFi 6

– At least AC1200 speed rating

– External antennas for better directional control

– Reasonable price point ($80-150)

Why This Works:

The limited space doesn’t require mesh capabilities. Signal strength from one well-placed router typically covers the entire area.

For Medium-Sized Homes

For homes between 1,200-2,500 square feet or smaller homes with signal-blocking features:

Best Option: High-end single router or entry-level mesh system

What to Look For:

– Tri-band capability for better traffic management

– WiFi 6 for future-proofing

– Beamforming and MU-MIMO support

– Price range: $150-300

Why This Works:

This size represents the crossover point where either approach can work. The choice of construction materials and layout ultimately determines the outcome.

For Large Homes and Multi-Floor Houses

Homes over 2,500 square feet or multi-story residences:

Best Option: Mesh WiFi system with multiple nodes

What to Look For:

– Dedicated backhaul channel for node communication

– WiFi 6 with future expansion capability

– Simple setup and management app

– Consideration of node placement options

– Price range: $250-500 for quality systems

Why This Works:

Multiple access points overcome distance limitations and physical barriers. The seamless network allows the technology to blend into the background.

For Smart Home Enthusiasts

If you’re connecting numerous smart home devices:

Best Option: Router with strong IoT support

What to Look For:

– Strong 2.4 GHz

– Thread or Zigbee integration in premium models

– Advanced QoS for prioritizing important traffic

– Simple device management interface

– Price range: varies widely based on features

Why This Works:

Smart homes create unique network challenges. Dozens of small devices require reliable but not necessarily fast connections.

For Serious Gamers

Competitive gamers need specific performance characteristics:

Best Option: Gaming-specific router with latency optimization

What to Look For:

– Gaming-specific QoS settings

– Geofiltering to connect to closer servers

– Strong 5 GHz performance

– Wired ethernet ports for critical gaming devices

– Price range: $150-400

Why This Works:

Gaming routers prioritize speed consistency over peak performance, reducing the lag spikes that ruin competitive gaming.

Installation Tips for Best Performance

Even the best router performs poorly with improper setup.

Optimal Router Placement

Location matters enormously. Follow these guidelines:

1. Central location whenever possible

2. Elevated position (shelves better than floor)

3. Away from other electronics that cause interference

4. Avoid enclosed spaces like cabinets or drawers

5. Antennas positioned vertically for most homes

For mesh systems:

1. Place nodes within sight of each other when possible

2. The main router is connected to the modem at a central location.

3. Nodes positioned to cover dead zones

4. Avoid daisy-chaining too many nodes in sequence

Initial Setup Best Practices

Once physically installed, optimize your settings:

1. Update firmware immediately after setup

2. Change default passwords for both WiFi and admin access

3. Enable automatic updates if available

4. Set up guest network for visitors

5. Configure security settings to WPA3 if supported

When to Use Wired Connections

Despite this being a WiFi guide, sometimes cables work better:

– Stationary devices benefit from wired ethernet

– Gaming consoles perform more consistently when wired

– Home offices should prioritize wired connections for videoconferencing

– Smart TVs stream more reliably with ethernet

Troubleshooting Common WiFi Problems

Even with the perfect router, issues sometimes arise.

Diagnosing Dead Zones

If certain areas still have poor coverage:

1. Use WiFi analyzer apps to measure actual signal strength

2. Consider signal boosters for specific problem areas

3. Adjust router or node placement to better cover weak spots

4. Check for interference sources near problem areas

5. Consider additional mesh nodes if problems persist

Dealing with Speed Issues

When connections seem slower than expected:

1. Test speeds at router vs. problem locations

2. Check for bandwidth-hogging devices or applications

3. Update router firmware and device drivers

4. Temporarily disconnect devices to identify potential issues

5. Consider channel congestion from nearby networks

Making Your Final Decision

With all this information, here’s how to make your choice:

1. Be realistic about your space needs – avoid purchasing more than you need for smaller spaces

2. Consider future needs as more devices become connected

3. Read current reviews focusing on reliability over peak speeds

4. Look for good mobile apps that simplify management

5. Check warranty periods – better routers often have longer coverage

6. Consider ecosystem compatibility if you have brand preferences

Remember that the “best” router isn’t always the most expensive one. It’s the one that reliably covers your space with speeds matching your internet service.

Conclusion

The perfect WiFi router transforms your connected experience from frustrating to seamless. By matching your specific home layout, device count, and usage patterns with appropriate technology, you’ll eliminate those maddening dead zones.

Whether you choose a powerful single router or a whole-home mesh system, proper setup and placement remain crucial. Take time to optimize your network after installation.

Technology keeps advancing, but today’s quality router should serve you well for 3-5 years. Invest according to your needs, and enjoy the feeling of reliable connectivity throughout your entire home. No more running to the living room for important Zoom calls or watching your phone switch to cellular data in certain rooms. Just consistent, whole-home coverage that works when and where you need it.

Few things are more frustrating than watching your phone battery drain to zero before the day ends. We’ve all experienced that moment of panic when the red battery icon appears during an important call or while navigating to a new location. While battery technology continues to improve, our usage demands grow just as quickly. The good news? You have more influence over your battery’s performance than you may realize. Let’s explore practical ways to extend both your daily battery life and the overall lifespan of your phone’s battery.

Understanding How Smartphone Batteries Work

Before diving into tips, it helps to understand what’s actually happening inside your phone.

Lithium-Ion Basics

Modern smartphones use lithium-ion batteries. These offer excellent power density but come with inherent limitations.

Key Characteristics:

  • No “memory effect” (unlike older battery types)
  • Limited number of charge cycles
  • Gradual capacity loss over time (unavoidable but manageable)
  • Sensitive to extreme temperatures
  • Chemical aging occurs regardless of usage

Each full discharge and recharge is considered one cycle. Partial charges are counted proportionally—for example, charging from 50% to 100% would count as half a cycle. This means frequent small top-ups are actually better than complete discharges.

Battery Health vs. Daily Battery Life

Two distinct but related concepts affect your experience:

Battery Health: The long-term capacity of your battery compared to when it was new. A battery with 80% health can only store 80% of the charge it could when it was new.

Daily Battery Life: How long your phone runs on a single charge today. This varies depending on usage patterns, settings, and the apps being used.

You can have excellent daily battery life on a phone with poor battery health by managing settings carefully. Conversely, even a new phone with perfect battery health can drain quickly with power-hungry settings.

Everyday Tips for Longer Battery Life

These practical adjustments help your phone last through the day without needing a recharge.

Screen Settings: Your Biggest Power Consumer

Your display consumes more power than any other component. Small adjustments make big differences.

Brightness Adjustments:

  • Use auto-brightness when possible
  • Manually lower brightness especially indoors
  • Consider dark mode for OLED screens (saves significant power)

Screen Timeout:

  • Set screen timeout to 30 seconds or less
  • Each minute your screen stays on unnecessarily drains battery

Refresh Rate:

  • If your phone has a high refresh rate (90Hz/120Hz), consider using standard 60Hz mode when battery life matters more than smooth scrolling

Lowering your screen brightness by 50% can add several extra hours to your battery life. This small tweak delivers the most noticeable improvement right away for most users.

Background Activity Management

Background apps consume power even when they’re not in active use.

App Background Refresh:

  • Disable background refresh for non-essential apps
  • On iPhone: Settings → General → Background App Refresh
  • On Android: Settings → Apps → (select app) → Battery → Background restriction

Location Services:

  • Use ‘While Using’ instead of ‘Always’ for location access.
  • Disable location for apps that don’t truly need it
  • Consider using precise location only when necessary

Push Notifications:

  • Each notification wakes your screen and uses radio
  • Disable notifications for non-essential apps
  • Consider batching notifications for social media

Many apps claim they need constant background access. In reality, most function perfectly fine without it. Be selective about which apps truly deserve these privileges.

Connectivity Power Drains

Wireless radios are major power consumers, often working hardest when signals are weak.

Wi-Fi Management:

  • Use Wi-Fi instead of cellular data when available
  • Turn off Wi-Fi when outside familiar networks
  • Disable “Auto-Join” for networks you rarely use

Bluetooth Considerations:

  • Turn off Bluetooth when not actively using it
  • Unpair devices you no longer use
  • Remember that connected wearables constantly communicate

Cellular Data Settings:

  • Turn off 5G to extend battery life if speed isn’t your top priority
  • Enable Low Data Mode to minimize background app activity and save data.
  • Use Airplane Mode in areas with weak or no signal to prevent unnecessary battery and data drain.

Your phone works harder when hunting for signals. In weak coverage areas, your battery drains faster as your phone boosts power to maintain connection. Sometimes temporarily using airplane mode makes sense.

Battery-Draining Features to Manage

Several fancy features significantly impact battery performance.

Widgets and Live Wallpapers:

  • Limit home screen widgets to those truly useful
  • Avoid animated wallpapers (especially on Android)
  • Consider simple, dark wallpapers for OLED screens

Hey Siri/OK Google:

  • Disable always-on voice assistants if battery life matters more
  • Consider requiring a button press instead of voice wake

App Power Hogs:

  • Check battery usage statistics to identify problem apps
  • Facebook, Snapchat, and games are typically top drainers
  • Consider lightweight alternatives (like browser versions)

Haptic Feedback:

  • Reduce vibration intensity or disable when possible
  • Keyboard haptics consume surprising amounts of power

Many of these features offer convenience at the cost of power. Evaluate which ones genuinely improve your daily experience and which you can live without.

Software Updates and Maintenance

Regular maintenance keeps your phone running efficiently.

System Updates:

  • Keep your phone’s operating system updated
  • Updates often include battery optimization improvements
  • Avoid running very old versions that lack modern power management

App Updates:

  • Update apps regularly for efficiency improvements
  • Developers often optimize battery usage in updates
  • Consider removing apps you no longer use

Occasional Restart:

  • Restart your phone weekly to clear memory issues
  • This stops runaway processes that drain battery
  • Morning is an ideal time to do this quick maintenance

Software optimization continues long after a phone releases. Taking advantage of these improvements ensures you benefit from the latest battery-saving technologies.

Long-Term Battery Health Preservation

Beyond everyday tips, these habits help prolong your battery’s long-term health and lifespan.

Optimal Charging Habits

How you charge significantly impacts long-term battery health.

The 20-80 Rule:

  • For maximum longevity, keep battery between 20-80%
  • Avoid frequent complete discharges when possible
  • Full 0-100% charges create more battery stress

Overnight Charging Considerations:

  • Modern phones handle overnight charging better than older models
  • However, staying at 100% for hours still causes stress
  • Consider using delayed charging or smart plugs to finish charging before waking

Fast Charging Trade-offs:

  • Fast charging generates more heat
  • Use standard charging when time isn’t critical
  • Wireless charging typically creates more heat than wired

While lithium-ion batteries don’t have “memory effects,” they do experience stress at extremely low or high charge levels. Finding a middle ground preserves long-term capacity.

Temperature Management

Heat is battery kryptonite. Keep your phone cool whenever possible.

Heat Avoidance:

  • Remove phone cases while charging
  • Keep phones out of direct sunlight
  • Avoid leaving phones in hot cars
  • Don’t place charging phones under pillows or blankets

Cold Weather Awareness:

  • Extreme cold temporarily reduces battery capacity
  • Keep phones close to your body in very cold weather
  • Allow cold phones to warm up before charging

Gaming and Heavy Usage:

  • Take breaks during processor-intensive activities
  • Consider removing cases during extended gaming sessions
  • Avoid charging while gaming when possible

Battery chemistry accelerates degradation at high temperatures. Even exposing your phone to high heat when not in use can permanently reduce capacity.

Storage Considerations

If you’re storing a phone for an extended period, proper preparation matters.

Ideal Storage Charge:

  • Store at approximately 50% charge
  • Don’t store fully charged or completely dead
  • Recharge to 50% every few months if possible

Storage Environment:

  • Choose cool, dry locations
  • Avoid extreme temperature fluctuations
  • Keep away from direct sunlight

These guidelines particularly apply when storing old phones as backups or when taking extended breaks from technology.

When to Use Battery Saving Modes

Most phones offer power-saving options for different situations.

Standard Power Saving Mode

This basic option balances performance and battery life.

What It Does:

  • Reduces background activities
  • May lower screen brightness
  • Limits performance for demanding tasks
  • Often changes display to 60Hz refresh rate

Best Used When:

  • You need your phone to last several more hours
  • Full performance isn’t critical
  • You’re unable to charge soon

This mode typically extends battery life by 20-30% with minimal noticeable impact for basic tasks.

Ultra/Extreme Power Saving Mode

This aggressive option maximizes battery life at significant feature cost.

What It Does:

  • Limits available apps to essentials
  • Uses simplified interface
  • May switch to grayscale display
  • Disables most background processes
  • Significantly reduces performance

Best Used When:

  • You need your phone to last as long as possible in emergencies
  • Only basic communication is needed
  • You’ll be without access to charging for long stretches

This mode can extend remaining battery life by 200-300%, but makes your smartphone function more like a feature phone.

Optimized Charging Features

Many newer phones include smart charging features worth enabling.

Apple Optimized Battery Charging:

  • Learns your routine and delays charging past 80%
  • Reduces time spent at full charge overnight
  • Available on iPhone with iOS 13+

Android Adaptive Battery:

  • Learns which apps you use and when
  • Restricts battery for rarely used apps
  • Improves over time as it learns your habits

Samsung Battery Protection:

  • Limits maximum charge to 85% when enabled
  • Significantly improves long-term battery health
  • Small daily capacity sacrifice for longer overall lifespan

These built-in features provide excellent balance between convenience and battery preservation. They’re worth enabling even if you ignore other battery tips.

Signs Your Battery Needs Replacement

Even with perfect care, batteries eventually need replacement.

Warning Signs:

Rapid Draining:

  • Battery drops percentage quickly during normal use
  • Phone dies long before it should

Unexpected Shutdowns:

  • Phone turns off despite showing battery remaining
  • Restarts show significantly lower battery percentage

Physical Swelling:

  • Any bulging in the phone case
  • Battery visibly expanded (immediate safety concern)

Heat During Regular Use:

  • Phone becomes excessively warm during basic tasks
  • Battery area feels hot when charging

Battery Health Below 80%:

  • iPhone: Settings → Battery → Battery Health
  • Android: Various methods depending on manufacturer
  • Third-party apps can provide estimates

Most manufacturers consider batteries below 80% capacity as candidates for replacement. The good news is replacement typically makes your phone feel brand new again.

Battery Myths Worth Debunking

Several persistent myths lead to counterproductive habits.

Myth: “First charge must be 24 hours”

Reality: Modern lithium-ion batteries come pre-calibrated. No break-in period or extended first charge helps.

Myth: “Always drain to zero before charging”

Reality: Complete discharges actually stress lithium-ion batteries. Partial charges are healthier.

Myth: “Charging overnight ruins batteries”

Reality: While not ideal, modern phones manage overnight charging reasonably well. Newer phones include features specifically designed to handle this common behavior.

Myth: “Official chargers are just overpriced”

Reality: Quality matters. Poor chargers deliver inconsistent power that stresses battery cells and can reduce lifespan significantly.

Myth: “Closing all background apps saves battery”

Reality: Constantly closing and reopening apps often uses more power than proper background management. Let your phone’s built-in systems handle most app management.

Practical Battery Strategies for Different Users

Different usage patterns call for different approaches.

For Office Workers:

  • Charge to 80% before leaving home
  • Top up during lunch if needed
  • Keep brightness moderate in indoor lighting
  • Consider a small portable battery for travel days

For Heavy Users:

  • Invest in a quality portable battery pack
  • Use power-saving mode proactively
  • Consider keeping a charger at work/school
  • Be strategic about intensive tasks when away from power
  • Look into battery health early in phone ownership

For Travelers:

  • Carry a portable battery with enough capacity for full recharges
  • Use airplane mode strategically when signal is poor
  • Download media before trips rather than streaming
  • Consider a backup power option for extended journeys
  • Lower screen brightness on flights and transit

For Occasional Users:

  • Don’t leave phones plugged in constantly
  • Consider charging to 80% rather than 100%
  • Restart phone periodically to clear memory
  • Be mindful of storage conditions when phone isn’t used

Conclusion

Your smartphone battery doesn’t have to be a source of daily anxiety. With strategic settings adjustments and mindful charging habits, you can significantly improve both daily battery life and long-term battery health.

The most effective approach combines immediate tactical changes (like brightness reduction) with long-term habits (like avoiding extreme heat). While no battery lasts forever, these practices can extend your battery’s useful life by months or even years.

Remember that battery management involves trade-offs. Decide which features matter most to you, and adjust your battery strategy accordingly. Sometimes maximum performance matters more than battery life. Other times, lasting through a long day away from chargers takes priority. The ideal balance is one that aligns with your unique needs and lifestyle.

With these practical tips, you’re now equipped to take control of your smartphone battery experience. No more mid-day panic about finding the nearest outlet – just reliable performance when you need it most.

We spend countless hours staring at screens. Whether you’re crunching spreadsheets, battling in virtual worlds, or editing photos, your monitor significantly impacts your experience. The right display can reduce eye strain, improve productivity, and enhance your digital content. The wrong one might leave you with headaches and frustration. Let’s cut through the technical jargon and find your perfect screen companion.

Understanding Your Primary Use Case

Before diving into specs and features, ask yourself an honest question: what will you actually be doing with this monitor most days?

For Office Work and Productivity

If spreadsheets, documents, and email dominate your screen time, your needs differ from gamers or designers.

What matters most:

  • Comfortable text clarity
  • Eye-friendly features
  • Screen space for multitasking
  • Adjustable positioning
  • Professional appearance

For many office workers, a quality 24-27″ display with good ergonomics matters more than ultra-high resolution or specialized gaming features. The ability to work for hours without eye fatigue is paramount.

For Gaming Experiences

Gamers have unique requirements that office monitors often can’t satisfy.

What matters most:

  • Fast response times
  • High refresh rates
  • Adaptive sync technology
  • Appropriate size for viewing distance
  • Specific panel technology matching game types

That smooth, lag-free experience during intense gaming moments requires different technology than document editing. Gaming monitors prioritize speed over perfect color accuracy.

For Creative Professionals

Designers, photographers, and video editors see monitors differently. Their work demands visual precision above all else.

What matters most:

  • Color accuracy and wide gamut
  • Resolution appropriate for detailed work
  • Consistent brightness across the screen
  • Calibration capabilities
  • Panel type suited to visual work

When your job involves making visual decisions, your monitor becomes a critical professional tool. Colors on screen must match final outputs, whether printed or digital.

Essential Monitor Specifications Explained

Let’s go over the main features in simple terms.

Screen Size and Resolution

These two specs work together. Bigger isn’t always better without matching resolution.

Size Guidelines:

  • 27″ Monitors: Ideal for most users, offering a perfect balance between screen size and desk space.
  • 32″ and Larger Monitors: Provides a more immersive viewing experience but requires extra desk space and a greater viewing distance.
  • 32″+ monitors: Delivers an immersive experience but needs additional desk space and a greater viewing distance

Resolution Options:

  • 1080p (1920 x 1080): Budget-friendly, sufficient for basic work and casual gaming
  • 1440p (2560 x 1440): Excellent middle ground balancing clarity and performance
  • 4K (3840 x 2160): Premium clarity for detailed work, requires more powerful graphics

How to Choose: The pixel density, or how closely the pixels are packed together, impacts the clarity of the image. As a rough guide:

  • 24″ looks sharp at 1080p
  • 27″ looks best at 1440p
  • 32″ and larger benefit from 4K

Too low a resolution for your screen size creates a grainy appearance. Too high might require scaling that defeats the purpose of the extra pixels.

Panel Types: The Core Technology

Not all LCD screens are created equal. The underlying panel technology dramatically impacts performance.

IPS Panels

IPS (In-Plane Switching) panels have become increasingly popular.

Strengths:

  • Excellent color accuracy
  • Wide viewing angles
  • Consistent appearance across the screen
  • Good color reproduction

Weaknesses:

  • Typically higher price
  • Slower response times than TN panels
  • Lower contrast ratios than VA panels
  • Potential for IPS glow in dark scenes

Best for: Creative professionals, general office work, and gamers who prioritize visual quality over absolute speed.

VA Panels

VA (Vertical Alignment) offers a different balance of features.

Strengths:

  • Superior contrast ratios (deeper blacks)
  • Better color reproduction than TN
  • Good middle ground between IPS and TN
  • Less expensive than comparable IPS

Weaknesses:

  • Slower response times can cause smearing in fast action
  • Narrower viewing angles than IPS
  • Color shift when viewed from angles
  • Less color-accurate than IPS

Best for: Movies and gaming where contrast matters, general use with emphasis on value.

TN Panels

TN (Twisted Nematic) is an older display technology that is still commonly found in budget and gaming monitors.

Strengths:

  • Fastest response times
  • Highest refresh rates for the price
  • No ghosting or smearing in fast motion
  • More affordable

Weaknesses:

  • Poor viewing angles
  • Limited color accuracy
  • Washed-out appearance compared to other panels
  • Poor black levels

Best for: Competitive gaming where speed trumps visual quality, budget-conscious buyers.

OLED Panels

OLED technology is now available in premium monitors.

Strengths:

  • Perfect black levels (pixels turn completely off)
  • Incredible contrast
  • Fast response times
  • No backlight bleed

Weaknesses:

  • Significantly higher price
  • Potential burn-in concerns
  • Lower peak brightness than some LCD monitors
  • Limited size and resolution options

Best for: Creative professionals with large budgets, serious entertainment enthusiasts.

Refresh Rate: How Smooth Is Your Motion?

Refresh rate measures how many times per second your screen updates.

Common Options:

  • 60Hz: Standard for basic monitors, sufficient for office work
  • 75Hz: Slight improvement over standard, entry-level gaming
  • 144Hz: Smooth gaming experience, noticeable improvement
  • 240Hz+: Ultra-responsive, primarily for competitive gamers

Real-world Impact:

  • Higher rates mean smoother motion and reduced blur
  • Everyday office work shows minimal benefit beyond 60Hz
  • Gamers notice significant improvements up to 144Hz
  • Diminishing returns beyond 144Hz for casual users

Your graphics card must be able to produce enough frames to take advantage of high refresh rates. A 240Hz monitor won’t improve visuals if your computer only outputs 60 frames per second.

Response Time: Reducing Blur and Ghosting

Response time measures how quickly pixels change color, usually reported in milliseconds (ms).

What to Look For:

  • Lower numbers mean less motion blur
  • Gaming typically requires 5ms or faster
  • 1ms is ideal for competitive fast-paced games
  • Creative work is less affected by response time

Manufacturer claims require scrutiny. A claimed “1ms” monitor might achieve this only in specific scenarios or with features that compromise image quality.

Color Accuracy and Gamut

Color performance matters especially for creative work but affects everyone’s experience.

Key Metrics:

  • sRGB coverage: Standard color space (100% is excellent)
  • DCI-P3 coverage: Wider color space for video work
  • AdobeRGB: Important for print designers
  • Delta-E: Measures color accuracy (lower is better)

For office work, decent sRGB coverage suffices. Creative professionals should seek monitors with 100% sRGB and good coverage of wider gamuts. Pre-calibrated monitors save time and effort.

Special Features Worth Considering

Beyond core specs, several features enhance specific use cases.

Adaptive Sync Technologies

These technologies synchronize your monitor’s refresh rate with your computer’s output.

G-Sync (NVIDIA):

  • Works with NVIDIA graphics cards
  • Usually commands premium pricing
  • Often includes additional quality control

FreeSync (AMD):

  • Works with AMD graphics cards
  • Generally less expensive
  • Wider range of implementation quality

G-Sync Compatible/FreeSync Premium:

  • Middle-ground certifications
  • Better quality than basic FreeSync
  • More affordable than full G-Sync

These technologies eliminate screen tearing and stuttering during gaming. They matter most for fast-paced games but benefit any moving content.

HDR Support

High Dynamic Range increases contrast between bright and dark areas.

What to Know:

  • Many “HDR-compatible” monitors lack brightness for true HDR
  • Look for at least 400 nits brightness, ideally 600+
  • HDR600 or HDR1000 certifications indicate quality implementation
  • Requires HDR content to show benefits

True HDR creates more realistic images with greater depth, but budget “HDR” monitors often provide negligible benefits. Don’t pay extra for weak HDR implementation.

Ergonomic Features

Your monitor’s adjustability affects comfort during long sessions.

Valuable Adjustments:

  • Height adjustment (essential for proper eye level)
  • Tilt capability (reduces glare and improves viewing angle)
  • Swivel function (helpful for sharing content)
  • Adjusting your monitor to a portrait orientation can be particularly beneficial for coding or reviewing documents. Properly positioning your monitor helps prevent neck strain and promotes better posture.

Proper monitor positioning prevents neck strain and improves posture. Budget monitors often sacrifice these features, creating potential health issues with prolonged use.

Connectivity Options

The ports on your monitor determine compatibility with your devices.

Common Connections:

  • HDMI: Different versions of the universal model support varying resolutions and refresh rates
  • DisplayPort: Usually supports higher specs than HDMI
  • USB-C: Convenient single-cable solution for modern laptops
  • USB Hub: Provides convenient connections for peripherals

For future-proofing, look for HDMI 2.0 or higher and DisplayPort 1.4 or higher. USB-C with Power Delivery can charge your laptop while simultaneously displaying its content.

Monitor Recommendations for Specific Users

Let’s look at ideal monitor profiles for different needs.

For the Productivity Professional

Ideal Specifications:

  • 27″ 1440p IPS panel
  • 60-75Hz refresh rate
  • Height-adjustable stand
  • Blue light filtering
  • USB-C connectivity

Why This Works: This configuration provides ample screen space with crisp text. The IPS panel ensures consistent appearance across the screen, while ergonomic features allow proper positioning. Office workers rarely benefit from gaming-focused features like high refresh rates.

Budget Option: 24″ 1080p IPS with height adjustment Premium Option: 32″ 4K IPS with USB-C hub and power delivery

For the Serious Gamer

Ideal Specifications:

  • 27″ 1440p IPS or VA panel
  • 144Hz or higher refresh rate
  • 1ms response time
  • Adaptive sync matching your graphics card
  • Good HDR implementation if budget allows

Why This Works: This balances resolution and performance. The 1440p resolution provides sharp images without the performance hit of 4K. A high refresh rate and low response time ensure smooth motion. Adaptive sync eliminates screen tearing during variable frame rates.

Budget Option: 24″ 1080p 144Hz VA panel with FreeSync Premium Option: 27″ 1440p 240Hz IPS with G-Sync and HDR600

For the Creative Professional

Ideal Specifications:

  • 27″ or 32″ 4K IPS panel
  • 99%+ sRGB and 95%+ DCI-P3 coverage
  • Factory calibration with Delta-E under 2
  • Hardware calibration support
  • Anti-glare coating

Why This Works: This configuration prioritizes color accuracy and detail. The 4K resolution allows precise work with fine details in photos or videos. Wide color gamut coverage ensures accurate reproduction across different color spaces. Factory calibration provides accuracy out of the box.

Budget Option: 27″ 1440p IPS with 100% sRGB coverage Premium Option: 32″ 4K OLED with 100% DCI-P3 and hardware calibration

For the Jack-of-All-Trades

Many users need a monitor that handles everything reasonably well.

Ideal Specifications:

  • 27″ 1440p IPS panel
  • 144Hz refresh rate
  • Adaptive sync technology
  • 99%+ sRGB color coverage
  • Ergonomic stand adjustments

Why This Works: This versatile setup performs admirably across different tasks. The 1440p resolution balances clarity and performance. 144Hz refresh rate improves gaming while not breaking the bank. Good color coverage handles creative tasks adequately. This “goldilocks” configuration suits most mixed-use scenarios.

Budget Option: 27″ 1080p 75Hz IPS with FreeSync Premium Option: 32″ 4K 144Hz IPS with wide color gamut

Common Mistakes to Avoid

Even informed buyers make these frequent errors when selecting monitors.

Overlooking Pixel Density

A 32″ 1080p monitor may seem impressive, but the lower pixel density results in a grainy image. Match resolution appropriately to screen size.

Focusing Only on Resolution

A 4K display isn’t automatically better than 1440p. Consider your graphics card capabilities, viewing distance, and whether you’ll need scaling to read text.

Ignoring Ergonomics

That budget monitor might look like a great deal until neck pain develops from its fixed-height stand. Ergonomic adjustments preserve long-term comfort and health.

Believing Marketing Claims

Terms like “1ms response time” and “HDR compatible” often come with significant caveats. Read independent reviews to verify real-world performance.

Buying for Future-Proofing Only

While considering future needs makes sense, don’t pay for features you won’t use for years. Technology improves and prices drop over time.

Making Your Final Decision

With so many options, follow these steps to narrow your choices:

  1. Establish your primary use case (productivity, gaming, creative work)
  2. Set a realistic budget that includes any necessary adapters or mounts
  3. Determine your ideal size based on desk space and viewing distance
  4. Choose appropriate resolution matching your size preference
  5. Select panel technology aligning with your visual priorities
  6. Consider connectivity needs for current and future devices
  7. Read recent reviews of models meeting your criteria
  8. Check return policies in case the monitor doesn’t meet expectations

Remember that the “best” monitor varies tremendously between users. A professional photographer’s dream display might frustrate a competitive gamer, and vice versa.

Conclusion

The right monitor transforms your digital experience. For productivity users, it means reduced eye strain and more efficient workflows. For gamers, it delivers smoother, more immersive play. For creatives, it ensures your work appears as intended.

Quality monitors typically last through several computer upgrades, making them worthwhile investments. While it’s tempting to save money here, consider how many hours you’ll spend looking at this screen over its lifetime.

Take your time selecting a display that matches your specific needs rather than chasing specifications you won’t benefit from. The perfect monitor isn’t the one with the highest numbers—it’s the one that serves your particular use case while respecting your budget constraints. With this guide in hand, you’re equipped to make an informed choice that will serve you well for years to come. Your eyes will thank you.

Power outages can happen unexpectedly. Storms, grid failures, and natural disasters can leave homes dark for hours or days. A dependable generator ensures peace of mind when emergencies strike. With so many choices available, selecting the right one can be challenging. This guide will walk you through the essential factors to consider when selecting a home generator.

Understanding Generator Types

Not all generators are created equal. Each type is designed to meet specific needs and comes with its own set of benefits and drawbacks.

Portable Generators

Portable generators are versatile and movable power sources. They’re typically wheeled units that can be stored in a garage or shed.

Pros of Portable Generators:

  1. Affordability: They’re the most budget-friendly option. Most models cost between $300 and $1,500.
  2. Versatility: You can use them for camping, tailgating, or job sites. They’re not just for emergencies.
  3. No installation required: Simply wheel them out, add fuel, and start. No electrician needed.
  4. Storage flexibility: They can be tucked away when not in use. This saves valuable space.
  5. Portability: You can take them wherever power is needed. This provides flexibility during various situations.

Cons of Portable Generators:

  1. Manual operation: You must set up and start them yourself. This can be challenging during severe weather.
  2. Limited capacity: Most can only power essential appliances. Whole-house coverage isn’t possible.
  3. Frequent refueling: They need gas every 8-12 hours. This means middle-of-night refueling during extended outages.
  4. Noise: They can be quite loud. This may disturb neighbors during nighttime use.
  5. Carbon monoxide risk: They should be used outdoors, at least 20 feet away from your home. Improper placement can be deadly.

Inverter Generators

Inverter generators are advanced portable units. They produce cleaner power through sophisticated electronics.

Pros of Inverter Generators:

  1. Clean power: They produce clean electricity that is safe for delicate electronics. Computers and medical devices stay safe.
  2. Fuel efficiency: They adjust engine speed based on demand. This saves fuel during longer outages.
  3. Quieter operation: They’re much less noisy than traditional portables. Some are conversation-quiet.
  4. Lightweight design: Most models are easy to carry. This makes setup simpler during emergencies.
  5. Parallel capability: Many models can be paired for more power. This offers expandability when needed.

Cons of Inverter Generators:

  1. Higher cost: Expect to pay $500-$4,000. This exceeds the capabilities of standard portable models.
  2. Lower maximum output: They typically produce less total power. This limits what you can run simultaneously.
  3. Still requires manual setup: Like standard portables, you must deploy them yourself.
  4. Requires proper maintenance: They need regular care to maintain their sensitive electronics.
  5. Limited fuel options: Most run only on gasoline. This can be problematic during fuel shortages.

Standby Generators

Standby generators are permanent installations. They’re directly integrated with your home’s electrical wiring and connected to the natural gas or propane line.

Pros of Standby Generators:

  1. Automatic operation: They start within seconds of power loss. No manual intervention required.
  2. Whole-house power: They can run everything from lights to central air conditioning. Larger models handle entire homes.
  3. Seamless transition: The switch from grid power to generator power occurs automatically. You might not even notice the outage.
  4. Continuous fuel supply: Connected to natural gas or large propane tanks. They can run for days or weeks.
  5. Weather-protected: They’re designed to operate in extreme conditions. Rain, snow, or heat won’t affect performance.

Cons of Standby Generators:

  1. Expensive: Expect to pay $2,000-$6,000 for the unit alone. Installation adds $3,000-$10,000 more.
  2. Permanent installation: They require professional installation. This covers both electrical work and fuel line connections.
  3. Permit requirements: Most localities require permits. This increases the overall time and makes the process more complex.Maintenance needs: They require regular professional servicing. This adds to the long-term cost.
  4. Space requirements: They need a permanent outdoor location. This may be challenging for some properties.

Portable Power Stations

Portable power stations are battery-based units. They store electricity for future use and operate without the need for fuel.

Pros of Portable Power Stations:

  1. Zero emissions: They produce no exhaust. They’re safe for indoor use.
  2. Silent operation: They make virtually no noise. This is ideal for nighttime or quiet neighborhoods.
  3. No fuel needed: They recharge from wall outlets or solar panels. This eliminates fuel storage concerns.
  4. Low maintenance: They have no engines to service. This reduces long-term care requirements.
  5. Indoor safe: They can be used anywhere. This offers placement flexibility during emergencies.

Cons of Portable Power Stations:

  1. Limited capacity: They can’t power major appliances for long periods. Energy-intensive devices drain them quickly.
  2. Slow recharging: Full recharges can take hours. This creates downtime between uses.
  3. High cost per watt: They provide less power for the price. Capacity comparable to generators costs more.
  4. Limited lifespan: Batteries degrade over time. Replacement may be needed after 3-5 years.
  5. Weather sensitivity: Extreme temperatures affect battery performance. This can reduce available power.

Determining Your Power Needs

Before shopping, calculate your emergency power requirements. This prevents buying more or less than you need.

Essential vs. Comfort Power

First, decide what you need to power during an outage:

Essential Power Needs:

  • Refrigerator (600-800 watts)
  • Freezer (500-700 watts)
  • Sump pump (800-1500 watts)
  • Well pump (1000-2000 watts)
  • Medical devices (varies)
  • Basic lighting (20-100 watts per fixture)
  • Internet/communication devices (50-200 watts)

Comfort Power Needs:

  • Heating system (500-2500 watts)
  • Air conditioning (1000-4000 watts)
  • Water heater (3000-4500 watts)
  • Cooking appliances (1000-1800 watts)
  • Entertainment systems (100-500 watts)
  • Washer/dryer (1000-5000 watts)

Calculating Total Wattage

Follow these steps to determine your generator size:

  1. List all critical devices you need during an outage.
  2. Note starting (surge) wattage for each item. Motors typically require 2 to 3 times more power to start than they do to run continuously.
  3. Record running wattage for continuous operation.
  4. Determine what runs simultaneously. Not everything needs power at once.
  5. Calculate the total maximum simultaneous running wattage.
  6. Add the highest individual starting wattage to your overall total.
  7. Add 20% safety margin to account for unexpected needs.

Example calculation for essential coverage:

  • Refrigerator: 800 watts running, 2400 watts starting
  • Sump pump: 1000 watts running, 2000 watts starting
  • Lights (5 fixtures): 300 watts running
  • Wi-Fi and phones: 100 watts running
  • Total running: 2200 watts
  • Highest starting wattage: 2400 watts (refrigerator)
  • Minimum generator size: 4600 watts
  • With 20% margin: 5520 watts

Based on this example, a 5500-7000 watt generator would be appropriate.

Fuel Types and Considerations

Generator fuel determines operation time, storage requirements, and convenience.

Gasoline

Most portable generators run on gasoline. It’s readily available but has limitations.

Pros:

  • Widely available
  • Familiar to most users
  • No special infrastructure needed

Cons:

  • Short shelf life (3-6 months without stabilizer)
  • Difficult to store safely in quantity
  • Often unavailable during widespread power outages
  • Requires frequent refueling

Propane

Many generators can run on propane (LPG). It offers several advantages over gasoline.

Pros:

  • Indefinite shelf life
  • Cleaner burning
  • Available during electricity outages
  • Easier to store safely

Cons:

  • Less energy-dense than gasoline
  • Reduced power output (10-15% less than gasoline)
  • Tank size limits run time
  • Becomes less effective in very cold temperatures

Natural Gas

Standby generators typically connect to natural gas lines. This provides continuous operation.

Pros:

  • Unlimited run time
  • No refueling needed
  • Widely available in many areas
  • Clean burning

Cons:

  • Requires permanent installation
  • Natural gas service may fail during disasters
  • Not available in all locations
  • Lower power output than gasoline or diesel

Diesel

Some larger generators use diesel fuel. These are common for industrial applications.

Pros:

  • Most fuel-efficient option
  • Longer engine life
  • Better performance under heavy loads
  • Longer shelf life than gasoline (12-24 months)

Cons:

  • Higher initial cost
  • Louder operation
  • More maintenance requirements
  • Fuel gelling in cold weather

Dual Fuel/Tri-Fuel Options

Some generators can run on multiple fuel types. These offer flexibility during emergencies.

Pros:

  • Flexibility during fuel shortages
  • Adaptation to available resources
  • Extended run times using different fuels

Cons:

  • Higher purchase cost
  • More complex maintenance
  • Slight reduction in efficiency

Important Features to Consider

Beyond power output and fuel type, several features affect usability and safety.

Electric Start

Push-button starting eliminates pull-cord frustration. This is especially valuable during nighttime emergencies or bad weather.

Automatic Transfer Switch (ATS)

For standby generators, an ATS detects power outages and automatically starts the generator. It also prevents dangerous backfeeding into power lines.

Low Oil Shutdown

This feature helps prevent engine damage by detecting and responding to low oil levels. It’s standard on most quality generators.

Fuel Gauge

A clear fuel level indicator helps avoid unexpected shutdowns. It simplifies monitoring during extended use.

Multiple Outlets

Various outlet types allow direct connection of different appliances. Look for 120V household outlets, 240V outlets, and USB ports.

Wheel Kit and Handles

For portable models, sturdy wheels and ergonomic handles significantly enhance ease of movement. This makes setup easier during emergencies.

Runtime Display

A display showing estimated remaining runtime helps plan refueling. This prevents unexpected shutdowns.

CO Detector/Automatic Shutdown

This crucial safety feature detects dangerous carbon monoxide levels and shuts down the generator. It’s potentially life-saving.

Weather-Resistant Covers

Protective covers shield generators from rain and snow. These extend service life for units stored outdoors.

Safety Considerations

Generator safety cannot be overlooked. Improper use can be deadly.

Carbon Monoxide Awareness

Carbon monoxide poisoning is the leading cause of generator-related deaths. Never run fuel-powered generators inside enclosed spaces or close to open windows.

Proper Placement

Make sure to place portable generators at least 20 feet away from your home. Position the exhaust so it is directed away from doors, windows, and air vents.

Electrical Safety

Use proper extension cords rated for generator use. Never connect generators directly to wall outlets.

Fuel Storage

Store fuel in certified containers and make sure they are kept at a safe distance from living areas. Rotate gasoline regularly to maintain freshness.

Operation During Wet Conditions

Use generator tents or canopies during rain. Never use the device in standing water or with wet hands.

Professional Installation

Have standby generators installed by qualified electricians. Improper installation can create fire hazards or endanger utility workers.

Making Your Final Decision

After considering all factors, follow these steps:

  1. Set a realistic budget that includes purchase, installation, and maintenance costs.
  2. Determine your minimum power requirements based on your calculations.
  3. Choose either a portable or standby option based on your specific requirements and budget.
  4. Select appropriate fuel type considering availability and storage capabilities.
  5. Verify physical space requirements for operation and storage.
  6. Check noise regulations in your neighborhood or HOA.
  7. Research warranty and service availability in your area.
  8. Read current user reviews focusing on reliability and support.

Maintenance Considerations

Proper generator maintenance guarantees dependable performance when you need it the most.

Regular Testing

Run your generator monthly for 20-30 minutes. This keeps components lubricated and batteries charged.

Oil Changes

Change oil according to the manufacturer’s schedule. Most portable units need changes every 50-100 hours of operation.

Fuel Management

Use fuel stabilizer for stored gasoline. Replace old fuel regularly. Keep tanks full to prevent condensation.

Battery Maintenance

For electric-start models, keep batteries charged and connections clean. Replace batteries every 2-3 years.

Professional Servicing

Schedule annual professional maintenance for standby generators. This typically includes filter changes, sparkplug replacement, and system checks.

Conclusion

The right generator offers essential peace of mind during power outages. By carefully assessing your power needs, budget constraints, and fuel preferences, you can select a model that meets your specific requirements.

Remember that the best generator is one that works when you need it. Regular upkeep and thorough testing guarantee dependable performance during emergencies. Whether you choose a simple portable unit or invest in a whole-house standby system, proper selection and care will provide peace of mind when the lights go out. Consider your generator as insurance against disruption. The initial investment may seem significant, but the security it provides during emergencies is priceless. With proper selection and maintenance, your generator will serve reliably for many years, keeping your home powered and your family comfortable during outages.

Setting up a home office involves thoughtfully selecting the necessary equipment. Among these, printers remain crucial despite our increasingly digital world. The right printer can streamline your workflow and save money over time. The wrong choice might lead to frustration and unexpected costs. This guide will help you navigate the different printer types and find your perfect match.

Understanding the Main Printer Types

Before diving into specific recommendations, let’s explore the four major printer categories available today.

Inkjet Printers

Inkjet printers operate by releasing tiny ink droplets onto the paper. They’ve been a home office staple for decades.

Pros of Inkjet Printers:

  1. Affordable upfront cost: Most inkjet printers are budget-friendly. Entry-level models start below $100.
  2. Excellent color reproduction: Inkjets excel at printing photos and colorful documents. They blend inks to create smooth color gradients.
  3. Versatile media handling: They can print on various materials. This includes materials like glossy photo paper, cardstock, and some types of fabric.
  4. Compact size: Most inkjet printers take up minimal desk space. This makes them perfect for compact home offices.
  5. Better photo quality: For home photography needs, inkjets typically outperform other printer types.

Cons of Inkjet Printers:

  1. High ink costs: Replacement cartridges can be expensive. The cost per page is generally higher compared to laser printers.
  2. Slower print speeds: Inkjets generally print more slowly than laser printers. This matters for high-volume users.
  3. Printhead clogs: If not used regularly, ink can dry and clog printheads. This requires cleaning cycles that waste ink.
  4. Less durable prints: Inkjet prints can smudge when wet. They may fade faster than laser-printed documents.
  5. Lower page yield: Ink cartridges generally have a lower page yield compared to toner cartridges. Frequent replacements may be necessary.

Laser Printers

Laser printers use a different technology. They employ static electricity and heat to fuse toner powder onto paper.

Pros of Laser Printers:

  1. Lower cost-per-page: Toner cartridges print more pages than ink cartridges. This makes them economical for high-volume printing.
  2. Faster print speeds: Laser printers work quickly. They can produce 20-40 pages per minute.
  3. Sharp text quality: They excel at producing crisp, professional text documents. This is perfect for business correspondence.
  4. Durability: Laser-printed documents resist fading and water damage. They won’t smudge when highlighted.
  5. Reliability: Laser printers usually require less maintenance due to having fewer moving parts. They rarely clog or require alignment.

Cons of Laser Printers:

  1. Higher upfront cost: Quality laser printers typically cost more initially. Color models are especially expensive.
  2. Larger footprint: They generally take up more space than inkjet models. This can be limiting in smaller home offices.
  3. Limited media options: Many laser printers struggle with specialty papers. Photo printing quality lags behind inkjets.
  4. Weight: Laser printers tend to be heavier. Transporting them around the office can be difficult.
  5. Power consumption: They consume more electricity than inkjet printers. This adds slightly to operating costs.

All-in-One (Multifunction) Printers

All-in-One printers integrate printing, scanning, copying, and occasionally faxing functions into a single device. They are available in both inkjet and laser models.

Pros of All-in-One Printers:

  1. Space efficiency: One device replaces multiple machines. This saves valuable desk space.
  2. Cost savings: Buying one multifunction device costs less than purchasing separate equipment.
  3. Convenience: Managing one device is simpler than juggling multiple machines. Driver management becomes easier.
  4. Streamlined workflow: Scan-to-email and similar features improve productivity. Documents move seamlessly between digital and physical forms.
  5. Modern connectivity: Most newer models offer wireless printing, mobile compatibility, and cloud integration.

Cons of All-in-One Printers:

  1. Single point of failure: If one function malfunctions, the entire unit might require replacement. This increases downtime risk.
  2. Feature compromises: Some all-in-ones excel at printing but offer mediocre scanning. Quality varies across functions.
  3. Potentially higher repair costs: Fixing multifunction devices can be more complex and expensive.
  4. Bulkier design: They’re typically larger than single-function printers. This might matter in very small spaces.
  5. More complexity: Additional features mean more potential software and hardware issues.

Tank-Based Printers

Tank-based printers (or “supertank” models) represent a newer category. They replace traditional cartridges with refillable ink reservoirs.

Pros of Tank-Based Printers:

  1. Dramatically lower running costs: Cost-per-page can be 10 times lower than cartridge-based systems. This brings substantial long-term savings.
  2. Environmental benefits: Less plastic waste from cartridges. Refills create minimal packaging waste.
  3. Convenience: Larger ink capacity means fewer refills. Some models can print thousands of pages before requiring a refill of ink.
  4. Clear ink levels: Transparent tanks show exactly how much ink remains. This eliminates surprise shortages.
  5. Quality comparable to standard inkjets: Print quality matches traditional inkjet technology. No compromise on output.

Cons of Tank-Based Printers:

  1. Higher initial investment: The initial price can be 2-3 times greater than that of comparable cartridge printers. This deters some buyers.
  2. Potential for mess during refills: Ink bottle refilling requires care to avoid spills and stains.
  3. Still prone to printhead issues: Like traditional inkjets, printheads can clog if the printer sits unused.
  4. Fewer model choices: The tank printer market offers fewer options than traditional printers.
  5. Bulkier design: The tanks add size to the printer footprint. They require more desk space.

Matching Printer Types to Common Home Office Needs

Different work styles demand different printer capabilities. Consider these scenarios:

For the Occasional Printer:

If you print less than 100 pages monthly, consider:

  • A basic inkjet printer
  • Entry-level all-in-one for occasional scanning
  • Focus on reliability over speed
  • Wireless connectivity for convenient printing

Recommended features:

  • Auto-duplexing (double-sided printing)
  • Mobile printing compatibility
  • Individual color cartridges to reduce waste

For the Home Business Owner:

If your business relies on regular document printing:

  • Monochrome laser printer for text-heavy documents
  • Mid-range all-in-one laser for versatility
  • Tank-based system if color printing is essential

Recommended features:

  • Higher-capacity paper trays
  • Network connectivity options
  • Robust duty cycle ratings
  • Faster print speeds (20+ ppm)

For the Creative Professional:

If your work involves photography or design:

  • Photo-quality inkjet printer
  • Wide-format capability for larger projects
  • Precise color reproduction

Recommended features:

  • Six-color ink systems for better photo quality
  • Borderless printing options
  • Specialty paper handling
  • Color calibration capabilities

For the Home Academic:

Students and educators should consider:

  • All-in-one inkjet for versatility
  • Tank-based system for higher-volume needs
  • Double-sided printing to save on paper costs

Recommended features:

  • Document feeder for multi-page scanning
  • OCR capabilities for digitizing texts
  • Cloud integration for sharing assignments

Important Factors Beyond Printer Type

While the printer category matters, several other factors deserve consideration:

Connectivity Options

Modern printers offer multiple connection methods:

  • Wi-Fi: Allows printing from any device connected to your network. This eliminates cable clutter.
  • Ethernet: Provides reliable wired network connections. Best for consistent heavy use.
  • USB: Direct computer-to-printer connection. Simple but limits placement options.
  • Bluetooth: Convenient for mobile device printing. Generally works within short ranges.
  • Cloud Printing: Print from anywhere via internet services. Essential for remote work.
  • NFC: Allows tap-to-print functionality from compatible devices. Adds convenience.

Running Costs

The true cost of a printer extends far beyond the purchase price:

  • Cost per page: Calculate this by dividing cartridge price by page yield.
  • Ink/toner efficiency: Some printers use more consumables for maintenance.
  • Electricity usage: Laser printers typically consume more power.
  • Replacement parts: Some printers require periodic maintenance kits.
  • Paper costs: Special papers add to overall expense.

Environmental Considerations

Eco-conscious consumers should evaluate:

  • Energy Star certification: Identifies energy-efficient models.
  • Duplex printing: Reduces paper consumption by 50%.
  • Cartridge recycling programs: Manufacturers differ in their recycling support.
  • Power consumption: Both in active use and standby modes.
  • Noise levels: Important in shared spaces or video call environments.

Making Your Final Decision

After considering all factors, follow these steps to finalize your choice:

  1. Set a realistic budget that includes both purchase price and two years of supplies.
  2. List your non-negotiable features based on your specific workflow needs.
  3. Explore the latest models from trusted brands such as HP, Epson, Brother, and Canon.
  4. Read user reviews focusing on long-term reliability and support experiences.
  5. Calculate total ownership costs including consumables for your expected print volume.
  6. Check compatibility with your existing devices and operating systems.
  7. Consider warranty terms and availability of local service options.

Conclusion

The perfect home office printer balances your specific needs with budget considerations. For text-heavy offices, laser printers typically offer better value. Creative professionals often benefit from quality inkjet printers. High-volume users should seriously consider tank-based systems despite higher upfront costs.

Remember that technology continues evolving. Today’s printers offer remarkable connectivity, quality, and convenience compared to models from just a few years ago. By matching your specific requirements to the right printer technology, you’ll enhance your home office productivity while keeping costs under control.

Take time to assess your true printing needs rather than being swayed by marketing features you’ll rarely use. The most expensive printer isn’t necessarily the best for your situation. The right printer feels almost invisible in your workflow – quietly handling your documents without requiring constant attention or maintenance.

In today’s digital age, data storage has become more crucial than ever. Photos, videos, documents, and other files need a safe home. Two popular choices stand out: external hard drives and cloud storage. Both have strengths and weaknesses. Let’s explore what makes each option shine and where they fall short.

External Hard Drives: The Physical Option

External hard drives are physical devices you can hold in your hand. They connect to your computer via USB, Thunderbolt, or other types of ports. These devices offer a tangible way to store your data.

Pros of External Hard Drives

1. One-Time Purchase

External drives require just one upfront payment. There are no monthly fees. Once you purchase it, it’s yours to keep and use for a lifetime. This makes them an affordable option for extensive storage requirements.

2. No Internet Required

You can access your files without an internet connection. This makes external drives perfect for areas with poor connectivity. You can access your data anytime, anywhere.

3. Fast Transfer Speeds

Local transfers are generally quicker than uploading or downloading from the cloud. Modern external SSDs can transfer files at speeds of 1000MB/s or more. This makes them ideal for working with large files like videos.

4. Complete Privacy Control

Your data stays in your hands. No third parties have access to your information. This gives you complete control over your privacy and security.

5. No Subscription Fatigue

You won’t have to add another recurring expense to your budget. In a world of subscription services, this comes as a relief to many users.

Cons of External Hard Drives

1. Physical Vulnerability

External drives can be damaged, lost, or stolen. If something happens to your drive, your data could be gone forever. Drives can fail due to drops, water damage, or simply age.

2. Limited Accessibility

You can only access your files when you have the drive with you. This limits flexibility when traveling or working across multiple devices.

3. No Automatic Backups

Most external drives don’t offer automatic data backup. You must remember to do this manually. Many users forget this crucial step.

4. Space Limitations

Once your drive is full, you need to buy another one. There’s no easy way to expand storage without purchasing new hardware.

5. No Built-in File Sharing

Sharing files stored on an external drive requires extra steps. You can’t easily collaborate with others using just the drive.

Cloud Storage: The Virtual Solution

Cloud storage keeps your data on remote servers. Companies like Google, Dropbox, and Microsoft manage these servers. You access your files through the internet.

Pros of Cloud Storage

1. Access From Anywhere

You can reach your files from any device with internet access. Your photos, documents, and videos are always with you, no matter where you go. This makes cloud storage extremely convenient.

2. Automatic Backups

Most cloud services automatically back up your data. You don’t need to worry about doing it yourself. Your files stay safe even if you forget.

3. Easy File Sharing and Collaboration

Sharing files is simple with cloud storage. Share a link to allow others to view or edit your files. This makes teamwork much smoother.

4. Scalable Storage

Need more space? Just upgrade your plan. You don’t need to buy new hardware. This flexibility adapts to your changing needs.

5. Protection Against Physical Damage

If your computer breaks or gets stolen, your cloud data remains safe. Your files exist on multiple servers in different locations. This redundancy protects against data loss.

Cons of Cloud Storage

1. Recurring Costs

Most cloud services charge monthly or yearly fees. These costs add up over time. Free plans offer limited storage space.

2. Internet Dependency

No internet means no access to your files. This could be an issue in areas with weak connectivity. You’re at the mercy of your connection speed.

3. Privacy Concerns

Your data lives on someone else’s servers. This brings up concerns about who has access to your information. Privacy policies vary widely between providers.

4. Security Risks

Cloud services can be hacked. Major breaches have occurred at even the largest companies. Your data security depends on the provider’s protection measures.

5. Speed Limitations

Uploading and downloading large files takes time. This depends on your internet speed. Working with video or large image files can be frustrating.

Making the Right Choice for Your Needs

The best storage solution depends on your specific situation. Consider these factors when deciding:

Choose External Hard Drives If:

  • You work with very large files regularly
  • You have limited internet access
  • Privacy is your top priority
  • You prefer one-time purchases over subscriptions
  • You need the fastest possible transfer speeds

External hard drives make sense for photographers, videographers, and anyone who works with large media files. They’re also great for people in remote areas with spotty internet.

Choose Cloud Storage If:

  • You need access to files across multiple devices
  • You collaborate with others frequently
  • You travel often or work remotely
  • You want automatic backups
  • You need flexible, scalable storage options

Cloud storage works well for business professionals, students, and anyone who values convenience over absolute privacy. It’s perfect for those who need to share files often.

Hybrid Approach: Getting the Best of Both Worlds

Many experts recommend using both solutions together. This creates a robust storage system with multiple layers of protection.

How to Implement a Hybrid Strategy:

  1. Store everyday working files in the cloud for easy access
  2. Keep sensitive documents on encrypted external drives
  3. Use external drives for complete backups of cloud data
  4. Store large media projects locally but back up finished work to the cloud

Make sure to keep at least one offline backup of your most crucial files

This approach maximizes convenience while minimizing risk. You’ll have the accessibility of cloud storage with the security of physical backups.

Cost Comparison

External Hard Drives:

  • 1TB portable drive: $50-$70 (one-time cost)
  • 2TB portable drive: $70-$100 (one-time cost)
  • 4TB desktop drive: $100-$120 (one-time cost)
  • 1TB portable SSD: $100-$150 (one-time cost)

Cloud Storage (Annual Costs):

  • Google One: $20 for 100GB, $30 for 200GB, $100 for 2TB
  • Microsoft OneDrive: $70 for 1TB, $100 for 6TB (family plan)
  • Dropbox: $120 for 2TB, $240 for 3TB
  • iCloud+: $12 for 50GB, $36 for 200GB, $120 for 2TB

Over five years, external drives usually cost less. But cloud services offer more features and flexibility.

Security Considerations

Data security matters regardless of storage method. Each option requires different security approaches.

Securing External Drives:

  • Use hardware encryption when available
  • Keep drives in safe, dry locations
  • Consider fireproof safes for critical backups
  • Create multiple backups of irreplaceable data
  • Test your backups regularly

Securing Cloud Storage:

  • Use strong, unique passwords
  • Enable two-factor authentication
  • Check privacy policies before choosing a provider
  • Be careful with shared links and permissions
  • Understand which countries host your data

Final Thoughts

Both external hard drives and cloud storage play crucial roles in contemporary data management. Neither option is perfect for every situation. Many users find the most success with a thoughtful combination of both.

Take into account your budget, internet connectivity, and data usage habits. These factors will help you choose the best storage solution for your needs.

Remember that the most important thing is having backups—regardless of which method you choose.

As technology evolves, these options will continue to improve. Storage capacities will increase while costs decrease. But the fundamental trade-offs between physical and cloud storage will likely remain. Choose wisely based on your specific needs. Protecting your digital life requires thought and planning. Take the time to develop a storage strategy that works for you. Your future self will thank you when you avoid data disasters through proper preparation.

Not all smart home devices are truly worth the investment, to be honest. For every truly useful device, there are dozens of overpriced toys that end up collecting dust after the novelty wears off. But some smart home tech genuinely delivers on the promise of saving time, cutting costs, and making life easier.

I’ve spent years testing smart home products and tracking their real-world impact on both convenience and utility bills. This guide cuts through the marketing hype to focus on devices that actually pay for themselves through energy savings, reduced waste, or meaningful time savings.

Smart Thermostats: The Gateway to Real Savings

Smart thermostats remain the undisputed champions of cost-saving smart home tech. Unlike many flashy gadgets, they deliver measurable returns through lower energy bills.

Why They Actually Work

The magic happens through optimization rather than magic. Smart thermostats learn your schedule and preferences, then make micro-adjustments you’d never bother with manually.

They detect when the house is empty and automatically adjust the temperature accordingly. Some models even track local energy prices and optimize usage during lower-cost periods. The best part? This happens seamlessly in the background without constant input.

The Real Savings

Many manufacturers claim that their products can reduce heating and cooling costs by 10-15%. My experience and research suggest this is actually realistic for most homes.

For an average American household spending $2,000 annually on heating and cooling, this could result in savings of $200 to $300 each year. With most smart thermostats priced between $130-250, they typically pay for themselves within 8-15 months.

Worth Considering

Google Nest Learning Thermostat remains the gold standard. Its learning capabilities are truly impressive, automatically creating schedules based on your behavior. The geofencing feature that detects when you’ve left home works reliably.

Ecobee Smart Thermostat offers similar savings with the added benefit of room sensors that detect occupancy and temperature in specific areas. Great for homes with significant temperature variations between rooms.

Amazon Smart Thermostat delivers most core features at a significantly lower price point (often under $100), making it the value winner if you’re on a tight budget.

Smart Plugs: Unexpected Utility Savers

Smart plugs don’t get much glory, but they’re workhorses for efficiency. These simple devices let you control and automate anything you plug into them.

Why They Actually Work

The average home wastes significant energy through vampire power—devices consuming electricity even when “off.” Smart plugs eliminate this waste by completely cutting power on schedules or on demand.

They also extend the life of non-smart appliances by adding automation. That old coffee maker or space heater suddenly becomes programmable without replacement.

The Real Savings

Energy savings vary widely depending on what you connect, but the convenience factor is substantial. Based on my tracking:

  • Connecting space heaters or window AC units to smart plugs with temperature triggers saves approximately 30% on their operating costs.
  • Using them with entertainment systems to truly power down components saves $40-60 annually per setup.
  • The ability to remotely check if appliances are running provides peace of mind that’s harder to quantify but equally valuable.

Worth Considering

Kasa Smart Plugs offer reliability at a reasonable price without requiring additional hubs or subscriptions.

Wyze Plug delivers similar functionality at an even lower price point—often under $15 per plug.

TP-Link Kasa Power Strip combines multiple smart outlets with surge protection, perfect for entertainment centers or home office setups.

Smart Lighting: Beyond Basic Bulbs

Smart lighting systems have evolved far beyond simple voice-controlled bulbs. The right setup now offers genuine efficiency and time-saving advantages.

Why They Actually Work

The savings come from three main factors:

  1. Energy efficiency – LED smart bulbs use 75-80% less energy than traditional incandescents and last 15-25 times longer.
  2. Usage optimization – Motion sensors, dimming capabilities, and scheduling reduce how much lights run unnecessarily.
  3. Targeted illumination – Lighting only what you need rather than entire rooms.

The Real Savings

A typical home converting from traditional to smart LED lighting saves $50-100 annually on electricity costs. While the initial investment is higher than standard LEDs, the extended lifespan (often 15+ years) and additional control features justify the premium for most households.

The time savings are equally valuable—no more walking through the house to check all lights before leaving or bedtime. One command or preset handles everything.

Worth Considering

Philips Hue remains the premium choice with the most robust ecosystem, though the required hub adds to initial cost.

LIFX bulbs are brighter than most competitors and don’t require a hub, making them ideal for targeted fixture upgrades.

Wyze Bulb Color offers exceptional value, delivering 90% of premium features at roughly one-third the price.

For maximum value, focus smart lighting on high-use areas rather than every socket in your home.

Smart Water Management: Underrated Money Savers

Water-focused smart devices don’t get the attention of flashier categories, but they deliver serious value through leak detection and usage optimization.

Why They Actually Work

Water damage is among the most expensive home repairs, averaging $2,000-10,000 per incident. Smart water monitors can detect leaks immediately—from catastrophic pipe bursts to slow drips that silently waste money.

Smart irrigation systems prevent overwatering by adjusting schedules based on weather forecasts, soil moisture, and seasonal needs.

The Real Savings

Smart water leak detectors potentially save thousands by catching problems early. Even a small leak can waste up to 10,000 gallons of water each year—enough to fill an entire backyard swimming pool.

Smart irrigation systems typically reduce outdoor water usage by 30-50%, saving hundreds annually for homes with landscaping needs while keeping plants healthier.

Worth Considering

Flume Smart Water Monitor attaches to your existing water meter without plumbing modifications and tracks usage down to the gallon, alerting you to unusual activity.

Phyn Plus offers whole-home water monitoring with automatic shutoff capabilities if leaks are detected, potentially preventing catastrophic damage.

Rachio Smart Sprinkler Controller replaces traditional irrigation timers with weather-aware scheduling that adjusts automatically to rainfall and seasonal needs.

Smart Security: Value Beyond Protection

Smart security devices do more than just protect your home—they save time and reduce costs in unexpected ways.

Why They Actually Work

The obvious benefit is deterring break-ins and property crime. But the real value for many homeowners comes from:

  • Package theft prevention
  • Reduced insurance premiums (often 5-20% discounts)
  • Remote home access for deliveries or service workers
  • Peace of mind that comes from visual verification of home status

The Real Savings

Insurance discounts alone can save $50-200 annually, depending on your policy and the systems installed. This often covers the entire cost of simpler security setups within 2-3 years.

The time savings from fewer missed deliveries, remote access for visitors, and not having to rush home to check on concerns add up significantly over time.

Worth Considering

Ring Video Doorbell remains the standard for front door security, with models available at various price points. The ability to speak to visitors remotely pays for itself in convenience.

Wyze Cam Outdoor delivers remarkable value for perimeter monitoring without subscription requirements.

SimpliSafe offers comprehensive security systems with professional monitoring options at roughly half the cost of traditional security services.

Smart Energy Monitors: Knowledge That Pays Off

You can’t manage what you don’t measure. Smart energy monitors offer in-depth analysis of your home’s power usage, revealing potential savings opportunities that you might otherwise overlook.

Why They Actually Work

Most homeowners have limited visibility into which appliances and systems consume the most power. Energy monitors identify these energy hogs and quantify their impact.

Armed with this data, you can make targeted changes—whether that’s replacing inefficient appliances, adjusting usage patterns, or identifying phantom power draws.

The Real Savings

Households typically reduce energy consumption by 10-15% simply from the awareness these devices provide. For homes with specific energy issues (like aging appliances or unusual usage patterns), savings can reach 20-30%.

Beyond direct savings, these systems help extend appliance life by identifying problematic power consumption that often precedes failures.

Worth Considering

Sense Energy Monitor installs in your electrical panel and uses pattern recognition to identify individual appliances over time.

Emporia Vue offers a more affordable alternative with similar whole-home monitoring capabilities.

Kasa Smart Plugs with Energy Monitoring provide per-outlet monitoring for specific devices without electrical panel installation.

Smart Appliances: Selective Upgrades Worth Making

Not all smart appliances deliver meaningful value. Some add unnecessary complexity to simple tasks. But certain categories consistently provide real utility and savings.

Why They Actually Work

The best smart appliances focus on reducing waste and optimizing resources rather than just adding screens to everything.

Smart features that genuinely help include inventory management in refrigerators, precision cooking controls, and maintenance alerts before major problems develop.

The Real Savings

While the premium for smart functionality varies widely, the most practical applications deliver both convenience and efficiency:

  • Smart washers and dryers can reduce water usage by 20-30% and energy consumption by 10-15% through load sensing and cycle optimization.
  • Smart refrigerators with internal cameras reduce food waste by an estimated 20-30% by helping you track inventory.
  • Connected ovens with precision temperature control reduce cooking failures and associated food waste.

Worth Considering

Samsung Family Hub Refrigerator allows you to check contents remotely while grocery shopping, preventing duplicate purchases.

LG Smart Washing Machines with TurboWash technology optimize water and energy usage based on load size and fabric type.

GE Profile Smart Ovens with precision cooking modes take the guesswork out of meal preparation, reducing wasted ingredients from cooking failures.

Rather than replacing everything at once, prioritize upgrading your oldest, least efficient appliances first for maximum return on investment.

Smart HVAC Add-ons: Efficiency Enhancers

Beyond thermostats, several smart HVAC enhancements deliver significant efficiency improvements to existing systems.

Why They Actually Work

These devices address specific inefficiencies in standard heating and cooling setups:

  • Smart vents optimize airflow by prioritizing rooms that need it the most
  • Temperature sensors improve comfort in the areas where you spend the most time
  • Filter monitoring prevents the efficiency losses of clogged air filters

The Real Savings

Properly balanced HVAC systems use 15-25% less energy than those cooling or heating rooms unevenly. Smart vents and sensors help achieve this balance without expensive zone systems.

Simple filter monitoring can prevent the 5-15% efficiency drop that occurs with dirty filters, while also extending system lifespan by reducing strain.

Worth Considering

Flair Smart Vents replace standard air registers and automatically adjust airflow based on room needs.

Ecobee Room Sensors work with compatible thermostats to focus on maintaining comfort in rooms that are occupied.

Filter Buy HVAC Filter Monitor provides simple tracking of filter condition to optimize replacement timing.

Hidden Savings: The Smart Home Hub Effect

While not directly cost-saving devices themselves, smart home hubs and ecosystems create efficiency through automation and scene creation.

Why They Actually Work

The real power of smart homes comes from devices working together intelligently. Effective automation removes repetitive tasks and enhances systems, reducing the need for constant oversight.

For example, a single “Leaving Home” routine might adjust your thermostat, turn off all lights, verify doors are locked, and disable unused appliances—all with one command.

The Real Savings

The primary value is time saved through eliminated routine tasks. For a family of four, this typically amounts to 30-45 minutes daily across various small conveniences.

Energy savings from comprehensive automation routines add up to an additional 5-10% reduction beyond the individual device benefits.

Worth Considering

Amazon Echo devices provide voice control and basic automation capabilities at accessible price points.

Samsung SmartThings Hub offers more sophisticated automation with broader compatibility across device brands.

Home Assistant provides the most powerful and customizable automation platform for those willing to invest some time in setup.

Getting Started: Strategic Implementation

The best approach to smart home technology balances immediate benefits with long-term integration.

Step 1: Start With the Biggest Impact Devices

Begin your smart home journey with the devices that deliver immediate returns:

  1. Smart thermostat (highest direct cost savings)
  2. Water leak detectors (highest potential disaster prevention)
  3. Smart plugs for energy-hungry devices

This foundation will provide immediate benefits while you learn the basics of smart home management.

Step 2: Create a Consistent Ecosystem

While mixing brands is sometimes unavoidable, try to maintain consistency within device categories. This simplifies management and improves reliability.

Consider standardizing on one voice assistant platform (Amazon Alexa, Google Assistant, or Apple HomeKit) as your primary control system.

Step 3: Automate Gradually

Start with simple automations like scheduled routines, then gradually implement more sophisticated triggers based on presence, weather, and other conditions.

Document your automations—it’s surprisingly easy to forget why you set things up a certain way months later.

Real-World Cost Benefit Analysis

Based on my experience and research, here’s what typical households can expect from a strategic smart home implementation:

Initial Investment:

  • Essential devices package (thermostat, water monitoring, lighting controls, plugs): $350-500
  • Mid-range implementation with security features: $750-1,200
  • Comprehensive smart home with appliance integration: $1,500-3,000+

Annual Savings:

  • Energy costs: 15-25% reduction ($300-600 for average homes)
  • Water usage: 10-30% reduction ($100-300 depending on location)
  • Potential disaster prevention: Immeasurable but significant
  • Time saved: 150-300 hours annually through automation and remote control

Most households achieve breakeven on their initial investment within 2-3 years, with ongoing savings afterward.

Beyond Cost Savings: Quality of Life Improvements

While this guide focuses on tangible savings, the most valuable benefits often transcend simple calculations:

  • The security of checking on your home while traveling
  • The convenience of voice-controlled environments for those with mobility challenges
  • The satisfaction of precise control over your living environment
  • The reassurance that critical systems are being monitored around the clock.

These benefits, while harder to quantify, often become the most appreciated aspects of smart home technology over time.

Final Thoughts: Smart Investments in Smart Homes

The most successful smart home implementations focus on solving specific problems rather than chasing the newest gadgets. Identify your home’s inefficiencies and friction points first, then seek out technology that addresses those specific challenges.

Remember that a thoughtfully automated home with a few carefully selected devices delivers more value than a collection of disconnected smart products without integration. Focus on creating systems rather than accumulating devices. With strategic implementation, smart home technology genuinely delivers on its promise of saving time, reducing costs, and enhancing comfort—making it one of the rare tech categories that can truly pay for itself.

Considering swapping your regular desk for a standing one? You’re not alone. Standing desks have seen a surge in popularity over the past decade. Everyone from your startup-obsessed cousin to major corporations like Google and Facebook have embraced them. But are they truly worth the investment and the buzz surrounding them?

I’ve spent years testing different work setups and talking to countless professionals about their experiences. This guide digs into everything you need to know before making the switch—no marketing fluff, just practical insights.

What Exactly Is a Standing Desk?

Standing desks are exactly what they sound like—desks designed for working while standing instead of sitting. But they’re not all created equal.

Types of Standing Desks

Fixed-height standing desks stay at one level. They’re simple and generally more affordable, but lock you into standing all day. Not ideal for most people.

Adjustable standing desks enable you to effortlessly alternate between sitting and standing positions. These come in two main flavors:

  • Manual adjustable desks use hand cranks or pneumatic lifts. They’re cheaper but require physical effort to adjust.
  • Electric adjustable desks allow you to change the height effortlessly with the push of a button. More expensive but way more convenient.

Desktop converters are designed to sit on top of your current desk. They’re perfect if you’re renting, sharing a workspace, or working with a tighter budget.

The Real Benefits of Standing Desks

Let’s cut through the marketing claims and look at what standing desks actually deliver.

Energy and Productivity Boosts

Standing naturally increases blood flow and oxygen to your brain. Many users have reported increased alertness and improved focus. My own experience backs this up—I’ve noticed sharper thinking during afternoon slumps when standing.

Research from the University of Leicester found workers who used standing desks reported better concentration and engagement with their work. Nothing magical—just the natural benefit of moving your body more throughout the day.

Physical Health Improvements

Reduced back pain is probably the most immediately noticeable benefit. A 2018 study published in the Journal of Occupational Health revealed that participants experienced a reduction of up to 32% in lower back pain after using standing desks for several weeks.

Better posture happens naturally when you’re mindful about standing. Your body aligns more naturally when upright compared to the hunched position many of us adopt while sitting.

Reduced risk of weight gain and obesity makes sense when you consider standing burns about 100-200 more calories per day than sitting. Not a replacement for exercise, but those calories add up over weeks and months.

Long-Term Health Benefits

The research on long-term benefits is still developing, but early findings suggest standing more throughout your day might help with:

  • Lowering blood sugar levels, especially after meals
  • Reducing risk of heart disease (by up to 147% according to some studies)
  • Reducing the risk of certain cancers associated with sedentary behavior.

The Drawbacks Nobody Talks About

Standing desks aren’t perfect for everyone. Here are the real downsides you should consider.

Physical Challenges

Leg and foot fatigue is real, especially when you first start. Your body needs time to adapt to standing for longer periods. My first week with a standing desk left my calves feeling like I’d run a marathon.

Joint pain can increase for some people. If you have existing knee, hip, or foot problems, standing for extended periods might aggravate these issues.

Varicose veins can be worsened by prolonged standing. This is particularly important for people with circulation issues or family history of vein problems.

Practical Limitations

Cost is a significant barrier. Quality adjustable standing desks start around $200 for basic models and can exceed $1,500 for premium options.

Space requirements matter too. Electric models need proximity to outlets, and some designs have larger footprints than traditional desks.

Adaptation period is unavoidable. Most people need 2-3 weeks to adjust to a new standing routine. During this transition, you might experience discomfort and potentially decreased productivity.

Finding Your Standing Sweet Spot

The key isn’t about standing all day—it’s about incorporating movement into your daily routine. Here’s how to find your ideal balance:

Start Slow and Build Gradually

Start with just 30 to 45 minutes of standing each day. Add 15 minutes each day until you find your comfort zone. Most experts suggest maintaining a balanced approach, aiming for an equal split between sitting and standing. Track your progress with a simple timer or app.

Perfect Your Standing Setup

Height matters tremendously. Your desk should position your elbows at approximately 90 degrees when typing, with your screen at eye level.

Invest in an anti-fatigue mat. This was a game-changer for me. These cushioned mats reduce pressure on your feet and joints, letting you stand comfortably for much longer periods.

Consider a balance board or standing stool for variety. These accessories encourage subtle movements that engage your core and reduce fatigue.

Create a Movement-Friendly Workspace

The best approach combines sitting, standing, and moving throughout your day.

Schedule walking meetings or phone calls. Take a quick break every hour to stretch your legs. Some people even add under-desk treadmills or cycling attachments for active sitting periods.

Remember: the best position is your next position. Consistent movement is more important than standing perfectly still for long periods.

Choosing the Right Standing Desk

With so many options to choose from, how do you select the right one? Here’s what really matters:

Key Features Worth Paying For

Height range should accommodate both your sitting and standing positions comfortably. Ensure the adjustment range is at least 20 inches.

Stability at full height is non-negotiable. A wobbly desk will drive you crazy and affect your work. Generally, higher-quality desks shake less when extended.

Weight capacity needs to support all your equipment plus pressure from leaning. Most high-quality desks can support a minimum of 200 pounds.

Memory settings (for electric models) save your preferred heights, making transitions seamless.

Budget-Friendly Options

Desktop converters like the Varidesk Pro Plus or VIVO Standing Desk Converter offer standing benefits without replacing your entire desk. They typically range from $100-350.

DIY solutions work for the budget-conscious. Many people create custom setups using adjustable shelving or stacked containers. Not the most elegant, but functional.

Used market deals are increasingly common as companies upgrade their office furniture. Check local listings for commercial-grade standing desks at steep discounts.

The Bottom Line: Are Standing Desks Worth It?

After years of personal experience and reviewing the research, my take is this: Standing desks are absolutely worth it for most people—but not as a miracle solution.

The real value comes from increased movement and postural variety throughout your day. Standing desks make this easier, but the benefits come from changing positions regularly, not just standing still for hours.

If back pain, energy slumps, or concerns about sedentary health risks affect you, a standing desk could be transformative. Just approach it as one part of an overall active work strategy rather than a complete solution.

FAQ About Standing Desks

How long should you use a standing desk at once?

Start with 30-45 minutes at a time, gradually increasing as your body adapts. Most experts suggest alternating between sitting and standing throughout the day, rather than standing continuously.

Do standing desks help with weight loss?

They can contribute modestly. Standing can burn about 100-200 more calories per day compared to sitting. While not dramatic, this adds up over time as part of an overall active lifestyle.

Are standing desks good for back pain?

Many users report significant improvement in back pain. Research indicates that using standing desks can reduce upper back and neck pain by as much as 54%, and lower back pain by approximately 32% over a period of several weeks.

How tall should my standing desk be?

Your standing desk should be adjusted so that your elbows are at a 90-degree angle when typing, and the screen should be positioned at eye level or just below it. This typically means positioning the desk at or slightly below elbow height.

Can standing desks be bad for you?

They can be if used improperly. Standing still for too long can cause foot pain, varicose veins, and circulation problems. The key is movement and variation, not replacing sitting with standing.

Which is better: a full standing desk or a desktop converter?

Full standing desks offer more stability and workspace but cost more and require replacing your existing desk. Desktop converters are more cost-effective and versatile, but they offer less workspace and may sometimes be less stable. Your choice depends on budget, space constraints, and how permanent you want the solution to be.

Do I need special shoes for a standing desk?

Not necessarily, but supportive, comfortable footwear helps significantly. Many standing desk users prefer cushioned athletic shoes or shoes with good arch support. Going barefoot on an anti-fatigue mat works well for many people too.

How much should I expect to spend on a quality standing desk?

Budget $200-400 for a decent desktop converter, $350-650 for a good manual or basic electric desk, and $600-1,200+ for a premium electric model with advanced features. Remember to factor in accessories like monitor arms or anti-fatigue mats.

Making the switch to a standing desk isn’t just following a trend—it’s about creating a workspace that helps your body function better throughout the day. Whether you go all-in with a premium electric model or start with a budget converter, the key is adding more movement and postural variety to your workday.

Summer beckons outdoor enthusiasts with promises of epic adventures, breathtaking views, and unforgettable experiences. Modern technology enhances these outdoor pursuits in remarkable ways, from capturing stunning moments to ensuring safety in remote locations. The right tech can make summer adventures more enjoyable, accessible, and memorable without detracting from the natural experience. This comprehensive guide explores the most innovative and practical outdoor technology for summer adventures, helping outdoor enthusiasts choose gear that truly enhances their wilderness experience.

Essential Power Solutions

Even the most impressive outdoor tech becomes useless without reliable power. Smart power solutions keep devices running throughout extended adventures.

Portable Solar Chargers

Solar charging technology has evolved dramatically in recent years, offering lightweight, efficient options for harvesting energy during outdoor adventures.

Key Features to Consider:

  • Wattage Output: Higher wattage panels (15-30W) charge devices faster
  • Weight-to-Power Ratio: Look for maximum output with minimum weight
  • Durability: Water-resistant and rugged construction withstands outdoor conditions
  • Portability: Foldable designs attach easily to backpacks
  • Multiple Ports: USB-A, USB-C, and other connection options expand versatility

Top Recommendations:

  • Goal Zero Nomad 20: Perfect balance of power, portability, and durability
  • BigBlue 28W Solar Charger: Multiple ports and excellent efficiency even in partial sunlight
  • Anker PowerPort Solar Lite: Perfect ultralight gear for minimalist trekking

Solar chargers work best during peak daylight hours and may require adjustment throughout the day for optimal charging angles. Many hikers drape these over their packs while walking to collect energy on the move.

Power Banks

Portable power banks provide dependable backup power regardless of weather conditions or time of day.

Key Features to Consider:

  • Capacity: Measured in mAh (milliamp hours), higher values indicate a greater charging capacity
  • Power Delivery: Fast-charging capabilities reduce waiting time
  • Input Options: Multiple ways to recharge
  • Durability Ratings: Look for IP67 or higher for water and dust resistance
  • Size-to-Capacity Ratio: Balance between portability and power capacity

Top Recommendations:

  • Anker PowerCore 20000 PD: Fast Charging with Exceptional Capacity
  • Goal Zero Venture 75: Rugged, waterproof design with multiple charging options
  • BioLite Charge 80 PD: Built to last with versatile charging options

For multi-day adventures, combining a power bank with a solar charger creates a renewable power system. Charge the power bank during daylight hours, then use it to power devices at night or during inclement weather.

Portable Power Stations

For car camping, overlanding, or basecamp setups, portable power stations provide substantial energy storage and output options.

Key Features to Consider:

  • Capacity: Measured in Watt-hours (Wh), ranging from 100Wh to 1500Wh+
  • Output Options: AC outlets, DC ports, USB connections
  • Charging Methods: Solar compatibility, car charging, wall outlet
  • Display Information: Battery level indicators and power consumption metrics
  • Weight: Consider portability needs versus capacity requirements

Top Recommendations:

  • Jackery Explorer 500: High-quality mid-sized unit featuring multiple output options
  • Goal Zero Yeti 500X: Compact design with impressive power management
  • EcoFlow River Pro: Fast-charging capability with expandable capacity

These larger units power everything from camera battery chargers to small refrigerators, making them ideal for extended stays or family camping trips.

Navigation and Safety Tech

Modern navigation tools dramatically improve outdoor safety while enhancing exploration capabilities.

GPS Devices

Dedicated GPS units offer reliability and functionality beyond smartphone apps, particularly in areas with poor cellular coverage.

Key Features to Consider:

  • Battery Life: Look for 20+ hours of continuous operation
  • Map Functionality: Preloaded maps and easy updating
  • Waypoint Management: Creating and organizing location markers
  • Water Resistance: IPX7 rating or better for rainy conditions
  • Display Visibility: Readability in bright sunlight

Top Recommendations:

  • Garmin GPSMAP 66i: Combines GPS with satellite communication
  • Garmin Montana 700: Touchscreen interface with excellent battery life
  • Magellan eXplorist 350H: Budget-friendly option with core features

Many dedicated GPS units now include emergency communication features, making them multi-functional safety devices.

Satellite Communicators

These devices provide critical communication capabilities beyond cellular networks, offering peace of mind during remote adventures.

Key Features to Consider:

  • Subscription Plans: Monthly or annual service options
  • Message Capabilities: Two-way texting, one-way messaging, or SOS only
  • Battery Life: Extended operation between charges
  • GPS Functionality: Navigation features beyond communication
  • Size and Weight: Portability considerations for different activities

Top Recommendations:

  • Garmin inReach Mini 2: Ultra-compact with two-way messaging
  • SPOT X: Affordable option with physical keyboard
  • Zoleo Satellite Communicator: Seamless transition between cellular and satellite

These devices require subscription plans ranging from basic emergency-only service to unlimited messaging packages. Most allow customizable check-in messages to keep family updated with pre-written texts.

Weather Stations

Portable weather instruments help predict conditions and make informed decisions about routes and camping locations.

Key Features to Consider:

  • Measurement Capabilities: Temperature, humidity, barometric pressure, wind speed
  • Forecast Accuracy: Trend prediction based on barometric changes
  • Durability: Construction suitable for outdoor conditions
  • Connectivity: Smartphone integration for data logging
  • Power Source: Battery life or alternative charging options

Top Recommendations:

  • Kestrel 3500 Weather Meter: Accurate, professional-level measurements in a compact design
  • WeatherFlow WEATHERmeter: Smartphone-connected comprehensive readings
  • Ambient Weather WM-4: Budget-friendly option with core functionality

These devices help adventurers anticipate weather changes before they become visible, providing crucial safety information in mountain environments where conditions can change rapidly.

Photography and Video Equipment

Capturing summer adventures has never been easier with specialized outdoor photography and video equipment.

Action Cameras

Purpose-built for adventure, these rugged cameras capture dynamic footage in challenging environments.

Key Features to Consider:

  • Image Stabilization: Reduces shake during movement
  • Resolution Options: 4K or higher video capability
  • Water Resistance: Waterproof ratings without additional housing
  • Battery Life: Recording duration and spare battery availability
  • Mounting System: Compatibility with various attachment points

Top Recommendations:

  • GoPro HERO11 Black: Industry-leading features and image quality
  • DJI Osmo Action 4: Excellent stabilization and front-facing screen
  • Insta360 ONE RS: Modular design with interchangeable lenses

Most action cameras now include time-lapse, slow-motion, and photo burst modes, making them versatile tools for creative outdoor content creation.

Outdoor Drones

Aerial photography adds spectacular perspective to outdoor adventures, capturing landscapes from previously impossible angles.

Key Features to Consider:

  • Flight Time: Longer battery life means more filming opportunity
  • Portability: Folding designs for easier packing
  • Camera Quality: Sensor size and resolution affects image quality
  • Wind Resistance: Stability in varying conditions
  • Intelligent Flight Modes: Automated filming capabilities

Top Recommendations:

  • DJI Mini 3 Pro: Ultralight design under regulatory weight limits with excellent camera
  • Autel EVO Lite+: Enhanced wind resistance and extended flight duration
  • Skydio 2+: Advanced obstacle avoidance for forest environments

Before flying, always check local regulations regarding drone usage, particularly in national parks, wilderness areas, and near wildlife. Many protected areas prohibit drone operation.

Weatherproof Cameras

Traditional cameras designed for outdoor conditions offer superior image quality for serious photographers.

Key Features to Consider:

  • Weather Sealing: Protection against dust and moisture
  • Sensor Size: Bigger sensors often result in better overall image performance
  • Lens Selection: Versatility for different shooting situations
  • Battery Life: Extended shooting without recharging
  • Weight Considerations: Balance between quality and portability

Top Recommendations:

  • Olympus Tough TG-6: Waterproof compact camera featuring microscope functionality
  • Fujifilm X-T4: Weather-sealed mirrorless with excellent image quality
  • Sony RX100 VII: Pocket-sized with remarkable zoom capability

Protective cases, lens filters, and microfiber cloths help maintain equipment in challenging outdoor conditions. Silica gel packets stored with cameras help prevent moisture damage during storage.

Wearable Technology

Modern wearables provide valuable metrics and functionality specifically designed for outdoor activities.

GPS Watches

These sophisticated wrist-mounted computers track activity, provide navigation, and monitor health metrics during outdoor pursuits.

Key Features to Consider:

  • Battery Life: GPS mode duration (typically 20-120 hours)
  • Navigation Features: Routes, waypoints, and breadcrumb trails
  • Sensors: Altimeter, barometer, compass, heart rate
  • Activity Profiles: Specialized tracking for hiking, swimming, cycling
  • Display Type: Traditional LCD vs. AMOLED vs. transflective

Top Recommendations:

  • Garmin Fenix 7: Premium multisport smartwatch with long-lasting battery life
  • Coros Vertix 2: Outstanding battery life combined with advanced mapping features
  • Suunto 9 Peak Pro: Ultralight design with comprehensive tracking

Many GPS watches now include physiological metrics like blood oxygen levels and recovery time estimates, helping adventurers make smarter decisions about exertion and rest.

Smart Eyewear

Specialized sunglasses incorporate audio and sometimes visual information while maintaining eye protection.

Key Features to Consider:

  • Audio Quality: Speaker placement and ambient sound awareness
  • UV Protection: Lens quality and coverage
  • Battery Duration: Usage time between charges
  • Microphone Performance: Call clarity in outdoor conditions
  • Durability: Sweat and water resistance

Top Recommendations:

  • Bose Frames Tempo: Superior audio quality with sports-focused design
  • Razer Anzu: Affordable option with blue light filtering
  • SunGod Pacebreakers Audio: Customizable with replaceable parts

These devices allow adventurers to listen to music, navigation prompts, or phone calls while maintaining environmental awareness, unlike traditional earbuds.

Fitness Trackers

Simplified wearables focus on core metrics with exceptional battery life for longer adventures.

Key Features to Consider:

  • Battery Life: Typically lasts for weeks instead of just days
  • Water Resistance: Suitable for swimming and watersports
  • Sleep Tracking: Recovery monitoring between adventure days
  • Heart Rate Accuracy: Consistent readings during activity
  • Simplicity: Streamlined interface without distractions

Top Recommendations:

  • Fitbit Charge 6: Excellent sleep tracking with GPS capability
  • Garmin Vivosmart 5: Lightweight design with impressive battery
  • Whoop 4.0: Subscription-based with advanced recovery metrics

These devices often serve as excellent backup trackers for longer expeditions where conserving battery on primary devices becomes crucial.

Campsite Technology

Specialized tech enhances comfort and convenience at the campsite without sacrificing the outdoor experience.

Lighting Solutions

Advanced lighting technology enhances campsite efficiency and safety during nighttime.

Key Features to Consider:

  • Lumens Output: Brightness appropriate for intended use
  • Light Temperature: Warmer light (2700-3000K) disturbs sleep patterns less
  • Battery Runtime: Duration at various brightness settings
  • Charging Options: USB rechargeable vs. replaceable batteries
  • Versatility: Hanging options, standing capability, emergency modes

Top Recommendations:

  • BioLite AlpenGlow Series: Color-changing options with natural flickering modes
  • Goal Zero Lighthouse 600: Dual functionality as lantern and power bank
  • Black Diamond Apollo: Compact design with excellent light dispersion

Many modern lighting solutions include red light modes that preserve night vision and attract fewer insects. Some also feature SOS flashing capabilities for emergencies.

Outdoor Cooking Tech

High-tech cooking equipment brings culinary creativity to outdoor settings.

Key Features to Consider:

  • Fuel Efficiency: Maximum cooking time from minimum fuel
  • Temperature Control: Precision adjustments for better results
  • Wind Resistance: Performance in challenging conditions
  • Setup Complexity: Ease of assembly and operation
  • Versatility: Multiple cooking methods from one system

Top Recommendations:

  • BioLite CampStove 2+: Generates electricity while cooking
  • Solo Stove Campfire: Smokeless design with efficient burning
  • Jetboil Genesis Basecamp System: Complete cooking solution with simmer control

Advanced camp cooking systems often integrate with smartphone apps for temperature monitoring, recipe guidance, and fuel level tracking.

Water Purification Technology

Modern filtration systems guarantee clean and safe drinking water from natural sources.

Key Features to Consider:

  • Filtration Method: Physical filter, UV light, chemical, or combination
  • Flow Rate: Water production speed
  • Filter Life: Duration or volume before replacement
  • Contaminant Removal: Bacteria, protozoa, viruses, chemicals
  • Maintenance Requirements: Cleaning procedures and frequency

Top Recommendations:

  • Grayl GeoPress: Press-to-purify system with comprehensive protection
  • LARQ Bottle PureVis: Self-cleaning water bottle with UV purification
  • LifeStraw Peak Series Collapsible Bottle: Integrated filter with lightweight design

These technologies reduce reliance on single-use plastic bottles while providing protection from waterborne illnesses during outdoor adventures.

Audio Equipment

Music and audio content enhance many outdoor experiences when used respectfully.

Outdoor Speakers

Rugged, portable speakers bring music to basecamp settings.

Key Features to Consider:

  • Durability Ratings: Waterproof and dustproof certifications
  • Sound Projection: Volume capability without distortion
  • Battery Duration: Playback time between charges
  • Connectivity Options: Bluetooth range and stability
  • Mounting Versatility: Attachment points for different situations

Top Recommendations:

  • JBL Flip 6: An ideal combination of exceptional sound quality and long-lasting durability
  • Ultimate Ears WONDERBOOM 3: 360-degree sound with float capability
  • Sonos Roam: Wi-Fi and Bluetooth with surprising sound quality

Always consider fellow outdoor enthusiasts and wildlife when using speakers in natural settings. Keep volume reasonable and respect quiet hours at established campgrounds.

Sport Earbuds

Specialized earbuds designed for active use provide personal audio without disturbing others.

Key Features to Consider:

  • Fit Security: Stability during movement
  • Awareness Mode: Ability to hear environmental sounds
  • Sweat Resistance: Protection from moisture damage
  • Control Interface: Easy operation during activity
  • Case Battery: Additional charges from the carrying case

Top Recommendations:

  • Jaybird Vista 2: Secure fit with excellent durability
  • Beats Fit Pro: Excellent sound with secure wing design
  • Shokz OpenRun Pro: Bone conduction for maximum awareness

For safety, many outdoor enthusiasts prefer bone-conduction headphones or earbuds with transparency modes that allow environmental awareness while enjoying audio content.

Weather-Specific Technology

Specialized gear addresses the unique challenges of summer weather conditions.

Heat Management Tech

Innovative solutions help maintain comfortable body temperature during hot weather adventures.

Key Features to Consider:

  • Cooling Method: Evaporative, phase-change, or active cooling
  • Activation Process: Pre-freezing, water soaking, or powered
  • Duration: Cooling effect longevity
  • Reusability: Single-use versus repeatable cooling
  • Weight Penalty: Added weight versus cooling benefit

Top Recommendations:

  • Mission Cooling Neck Gaiter: Evaporative cooling with UPF 50 protection
  • Arctic Heat Cooling Vest: Phase-change cooling for extreme conditions
  • Torras Coolify Portable Neck AC: Battery-powered active cooling

These technologies supplement traditional heat management strategies like proper hydration, appropriate clothing, and activity timing.

Weather-Resistant Gear Protection

Specialized covers and cases protect sensitive equipment from environmental damage.

Key Features to Consider:

  • Material Quality: Waterproofing effectiveness and durability
  • Accessibility: Usage without complete removal
  • Size Options: Proper fit for specific equipment
  • Sealing Mechanism: Zipper, roll-top, or press-seal closures
  • Transparency: Visual access to screens and controls

Top Recommendations:

  • Pelican Cases: Professional-grade protection for cameras and electronics
  • Sea to Summit Big River Dry Bags: Versatile protection with reliable closure
  • YETI SideKick Dry: Magnetic closure with absolute waterproofing

Even “waterproof” devices benefit from additional protection during extreme conditions. These solutions offer protection against equipment failure during crucial moments.

Connectivity Solutions

Keeping digital connections intact boosts safety and convenience during outdoor adventures.

Signal Boosters

These devices extend cellular reception in marginal coverage areas.

Key Features to Consider:

  • Frequency Bands: Compatibility with your carrier
  • Power Requirements: Battery operation versus fixed installation
  • Gain Rating: Signal amplification strength
  • Directional vs. Omnidirectional: Coverage pattern
  • Portability: Weight and setup complexity

Top Recommendations:

  • WeBoost Drive Reach: Vehicle-mounted with impressive range
  • SureCall Flare 3.0: Portable option for basecamp setup
  • HiBoost Travel 4G 2.0: Comprehensive frequency coverage

Signal boosters work best when there’s at least minimal existing signal to amplify. They cannot create coverage in areas with absolutely no service.

Mesh Networks

These systems allow communication between group members without cellular service.

Key Features to Consider:

  • Range: Distance between devices while maintaining connection
  • Battery Life: Operation duration between charges
  • User Capacity: Maximum number of connected devices
  • Features: GPS location sharing, text, voice, or media capabilities
  • Environmental Resilience: Water and dust resistance

Top Recommendations:

  • Garmin Fenix: Node-to-node communication between compatible devices
  • Beartooth: Smartphone add-on for off-grid communication
  • goTenna Mesh: Lightweight solution with excellent range

These technologies create local communication networks when traditional services fail, improving group coordination and safety in remote areas.

Emerging Outdoor Technologies

Innovative new products continue to expand possibilities for outdoor adventure.

Portable Water Activities Tech

Inflatable and packable water equipment opens new adventure possibilities.

Key Features to Consider:

  • Packed Size: Storage and transport dimensions
  • Setup Time: Inflation duration and complexity
  • Durability: Material quality and puncture resistance
  • Weight Capacity: User and gear limitations
  • Stability: Performance in various water conditions

Top Recommendations:

  • Kokopelli Packraft Rogue-Lite: Optimized design for smooth and efficient water crossings in the backcountry
  • GILI Komodo Inflatable Kayak: Can be used as a solo or tandem kayak
  • NIXY Manhattan G4 Paddle Board: Stable platform with advanced construction

These packable designs allow adventurers to incorporate water travel into longer trips without dedicated watercraft transportation.

Smart Outdoor Apparel

Clothing with integrated technology enhances comfort and functionality.

Key Features to Consider:

  • Temperature Regulation: Active warming or cooling capabilities
  • Power Requirements: Battery life and charging method
  • Washability: Care instructions and durability
  • Control Interface: Adjustment accessibility and simplicity
  • Traditional Performance: Function without power

Top Recommendations:

  • Ororo Heated Vest: Targeted warming with impressive battery life
  • SCOTTeVEST: Multiple secure tech pockets with cable management
  • Columbia Omni-Heat Infinity: Passive heat reflection technology

The integration of technology into clothing continues to evolve, with some items incorporating solar charging panels, biometric sensors, and adaptive insulation.

Compact Drones Platforms

Ultra-portable drones bring aerial photography capability to even minimalist adventures.

Key Features to Consider:

  • Folded Dimensions: Packed size for transport
  • Flight Capabilities: Stability, range, and smart features
  • Camera Quality: Sensor size and resolution capability
  • Control Method: Controller requirements or phone operation
  • Regulatory Compliance: Weight class and registration requirements

Top Recommendations:

  • DJI Mini 3: Sub-250g weight with excellent image quality
  • Autel Nano+: Compact design with obstacle avoidance
  • Fimi X8 Mini: Budget-friendly with impressive specifications

These lightweight platforms allow backpackers and trail runners to capture aerial perspectives without significant weight penalties.

Practical Tech Integration

Balancing technology use with outdoor experience requires thoughtful integration.

Creating a Tech System

Rather than accumulating individual gadgets, consider how devices work together.

System Considerations:

  • Power Flow: How energy moves between collection, storage, and devices
  • Data Management: Information sharing between devices
  • Weight Distribution: Balanced packing for comfortable carrying
  • Redundancy Planning: Backup options for critical functions
  • Progressive Complexity: Core system with situational additions

Implementation Tips:

  • Create visual diagrams of power and data connections
  • Practice system setup before critical trips
  • Identify single points of failure and address with backups
  • Minimize proprietary connectors when possible
  • Standardize on cable types to reduce adapter needs

A well-designed tech system enhances reliability while reducing overall weight and complexity.

Digital Minimalism in the Outdoors

Technology should enhance rather than distract from natural experiences.

Balancing Principles:

  • Intentional Usage: Clear purpose for each device
  • Scheduled Disconnection: Designated tech-free periods
  • Nature-First Mindset: Technology serves the experience, not vice versa
  • Minimal Notification: Reducing digital interruptions
  • Group Etiquette: Established norms for technology use

Implementation Tips:

  • Use airplane mode with GPS enabled to reduce distractions
  • Download necessary information before losing connectivity
  • Establish device-free mealtimes or scenic viewpoints
  • Capture experiences in the moment, edit and share later
  • Consider a technology “sunset” hour before sleep

Thoughtful limitations often enhance the outdoor experience more than unlimited access to every possible device.

Making Smart Outdoor Tech Investments

With countless options available, strategic purchasing maximizes value and functionality.

Prioritization Strategy

Begin with foundational items that address safety and core functionality.

Priority Framework:

  1. Safety Essentials: Navigation, communication, weather protection
  2. Power Management: Charging and power storage systems
  3. Documentation Tools: Photo and video equipment
  4. Comfort Enhancers: Camp technology and convenience items
  5. Specialized Activity Gear: Sport-specific technology

This progression ensures critical needs receive appropriate investment before allocating resources to comfort or specialized items.

Maximizing Value

Smart purchasing strategies help build a capable outdoor tech collection without breaking the budget.

Value Approaches:

  • Previous Generation Models: Often 80% of the functionality at 50% of the price
  • Multi-Function Devices: Items serving multiple purposes reduce overall needs
  • Quality Hierarchy: Prioritize durability for essential items, and save on less critical ones.
  • Rental Experience: Test before purchasing expensive specialty equipment
  • Community Sharing: Group purchases of occasionally-used equipment

For many outdoor enthusiasts, investing in fewer, higher-quality items provides better long-term value than accumulating numerous budget options.

Conclusion

Summer adventures reach new heights when complemented by thoughtfully selected technology. The right devices enhance safety, capture memories, and sometimes even provide comforts previously unavailable in outdoor settings. The key lies in selecting tools that truly enhance the experience without creating dependency or distraction from the natural world.

The most successful outdoor technology integration maintains nature as the primary focus while allowing technology to play a supportive role. This balance seamlessly combines the classic appeal of outdoor adventure with the advanced features of contemporary technology. By carefully selecting equipment that addresses specific needs and integrates seamlessly into outdoor activities, summer adventures become safer, more accessible, and more memorable. As technology continues to evolve, tomorrow’s outdoor adventures will benefit from even more lightweight, durable, and capable tools. The truly tech-savvy adventurer recognizes not only which innovations to adopt but also when to power down and simply enjoy the natural splendor that inspired the journey in the first place.

Newer Posts